> ## Documentation Index
> Fetch the complete documentation index at: https://docs.usefini.com/llms.txt
> Use this file to discover all available pages before exploring further.
# Home
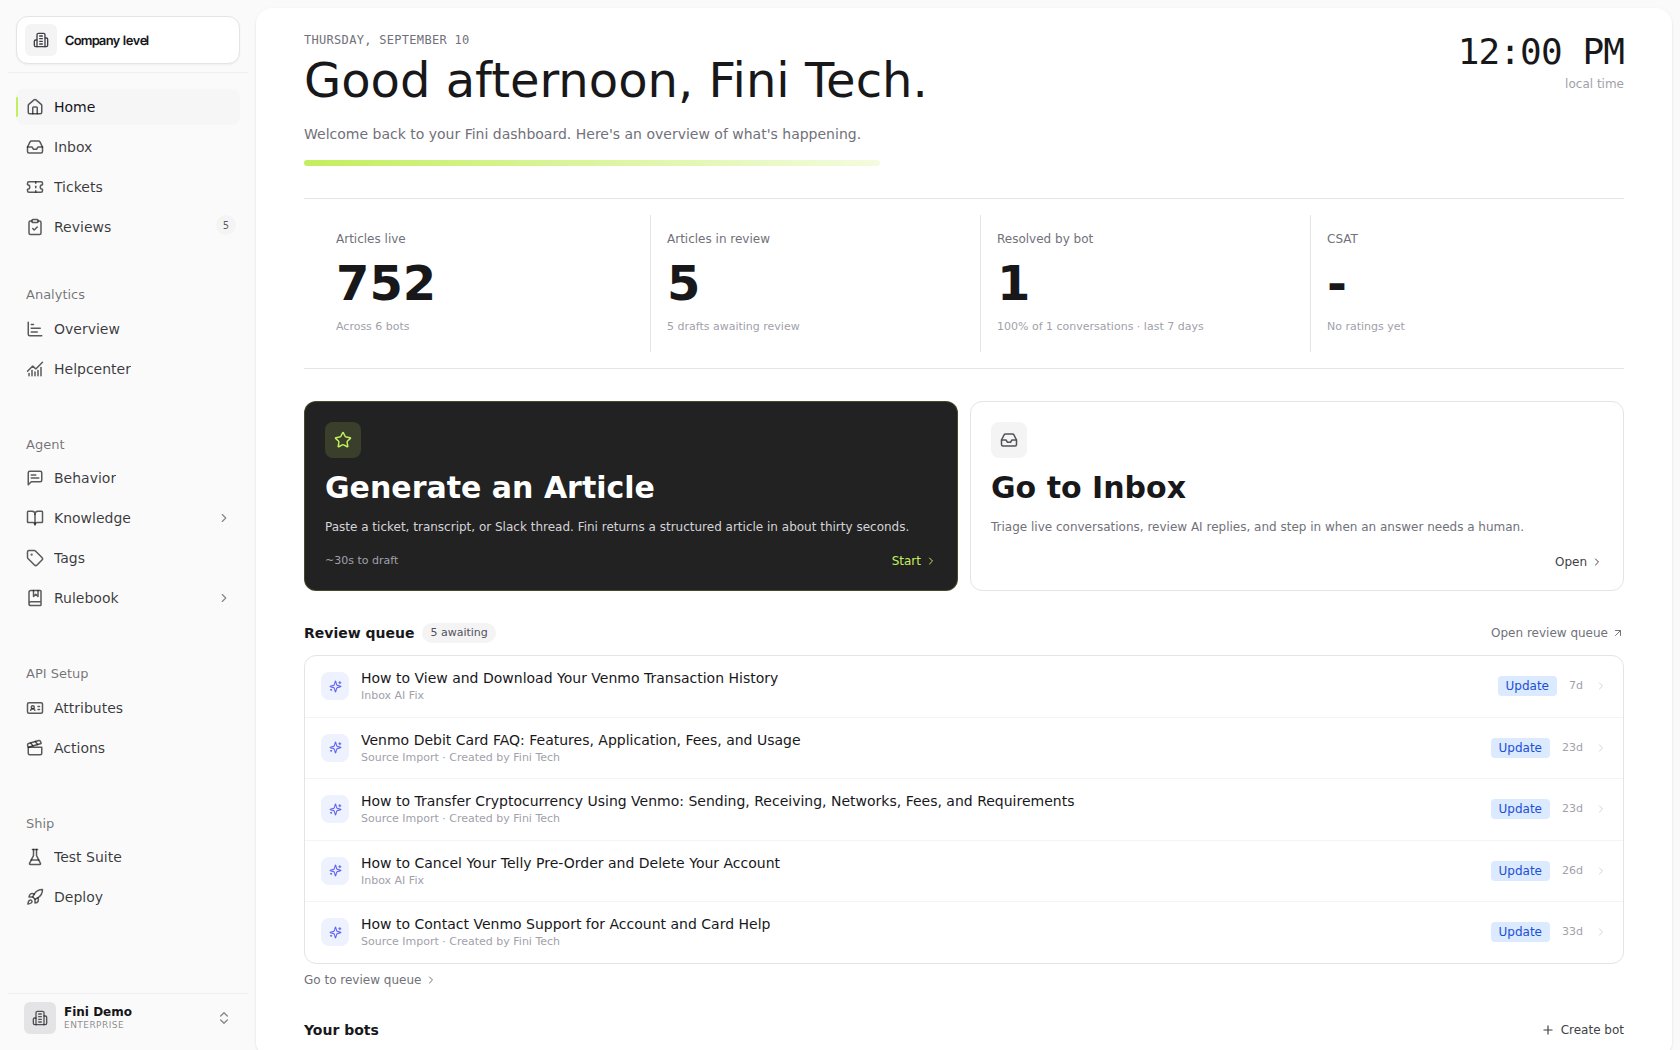
> The Fini dashboard landing page. Use it to review workspace health, open the review queue, jump into Inbox, and manage the bots in your workspace.
## Overview
Home is the dashboard landing page for your workspace. It shows high-level operating signals — live articles, review backlog, resolved conversations, and CSAT — plus shortcuts into review work, Inbox triage, and the bots in your workspace.
Each bot is an agent: its own knowledge scope, its own [Behavior](/en/configuration/prompts), its own [Rulebook](/en/automations/rulebook), and its own deployment surfaces. Most teams end up running multiple bots side by side — one for customer support, one for internal IT, one scoped to a specific product line, one for a specific brand. Same workspace, different lanes.
 ***
## Managing bots from Home
The **Your bots** section lists the bots in the workspace with conversation, resolved, and resolution-rate snapshots. Use **+ Create bot** when your workspace needs a new agent, or open an existing bot to continue configuration.
Name bots by function from day one. `Support-Billing` scales better than `Bot-1`, especially once the same workspace has multiple deployment surfaces and review queues.
***
## The agent selector
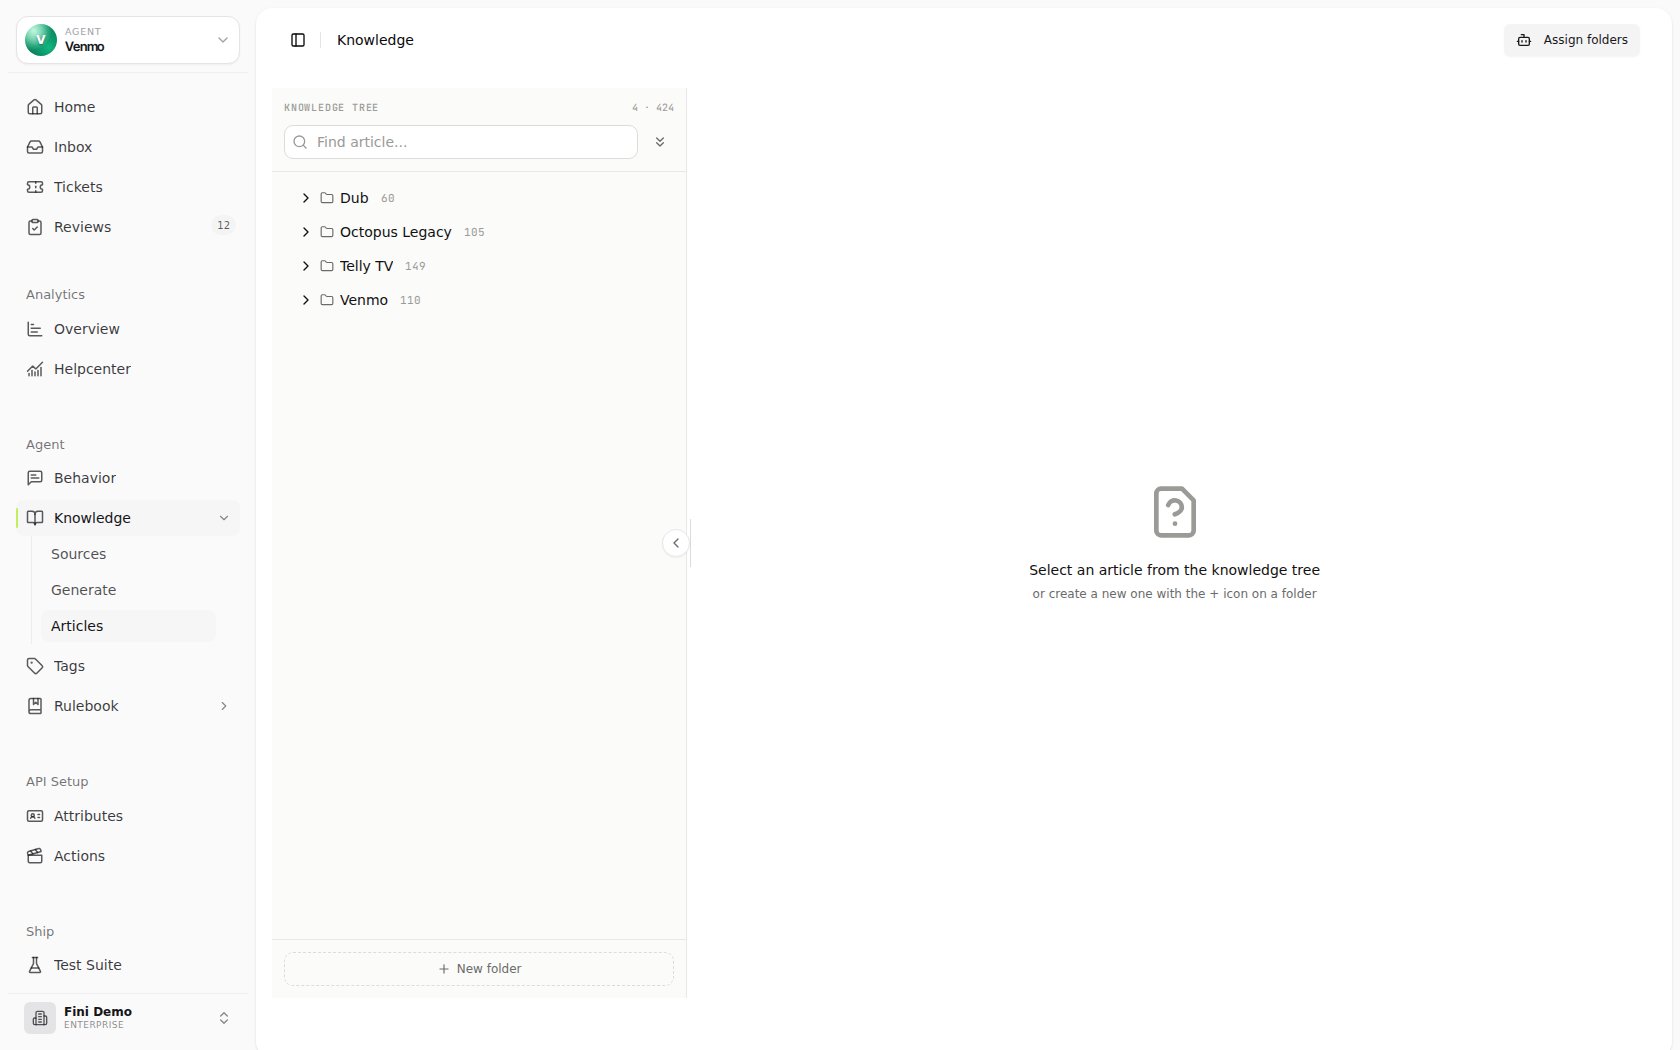
Most pages in Fini ([Knowledge](/en/knowledge/overview), Inbox, Test Suite, Analytics) scope their data to a single agent using the **agent selector** in the product shell. The selector defaults to whichever agent was last active; switch it to scope the page to a different agent's data.
The selector behaves slightly differently per surface, but the principle is the same:
### Knowledge
When set to **All**, the Knowledge page shows every article across every agent in your account. Switch the selector to a specific agent to filter the folder tree and article list to only the knowledge connected to that agent. See [Articles](/en/knowledge/articles) for how per-agent scoping actually works (toggle attachments, don't duplicate articles).
***
## Managing bots from Home
The **Your bots** section lists the bots in the workspace with conversation, resolved, and resolution-rate snapshots. Use **+ Create bot** when your workspace needs a new agent, or open an existing bot to continue configuration.
Name bots by function from day one. `Support-Billing` scales better than `Bot-1`, especially once the same workspace has multiple deployment surfaces and review queues.
***
## The agent selector
Most pages in Fini ([Knowledge](/en/knowledge/overview), Inbox, Test Suite, Analytics) scope their data to a single agent using the **agent selector** in the product shell. The selector defaults to whichever agent was last active; switch it to scope the page to a different agent's data.
The selector behaves slightly differently per surface, but the principle is the same:
### Knowledge
When set to **All**, the Knowledge page shows every article across every agent in your account. Switch the selector to a specific agent to filter the folder tree and article list to only the knowledge connected to that agent. See [Articles](/en/knowledge/articles) for how per-agent scoping actually works (toggle attachments, don't duplicate articles).
 ### Inbox
The Inbox scopes conversations to a single agent the same way. Once you select an agent, use the date range picker and filter chips (**Ticket Id**, **Conversation status**, **Channel**, **Source**, and **+ Filter**) to drill into exactly the conversations you need.
### Inbox
The Inbox scopes conversations to a single agent the same way. Once you select an agent, use the date range picker and filter chips (**Ticket Id**, **Conversation status**, **Channel**, **Source**, and **+ Filter**) to drill into exactly the conversations you need.
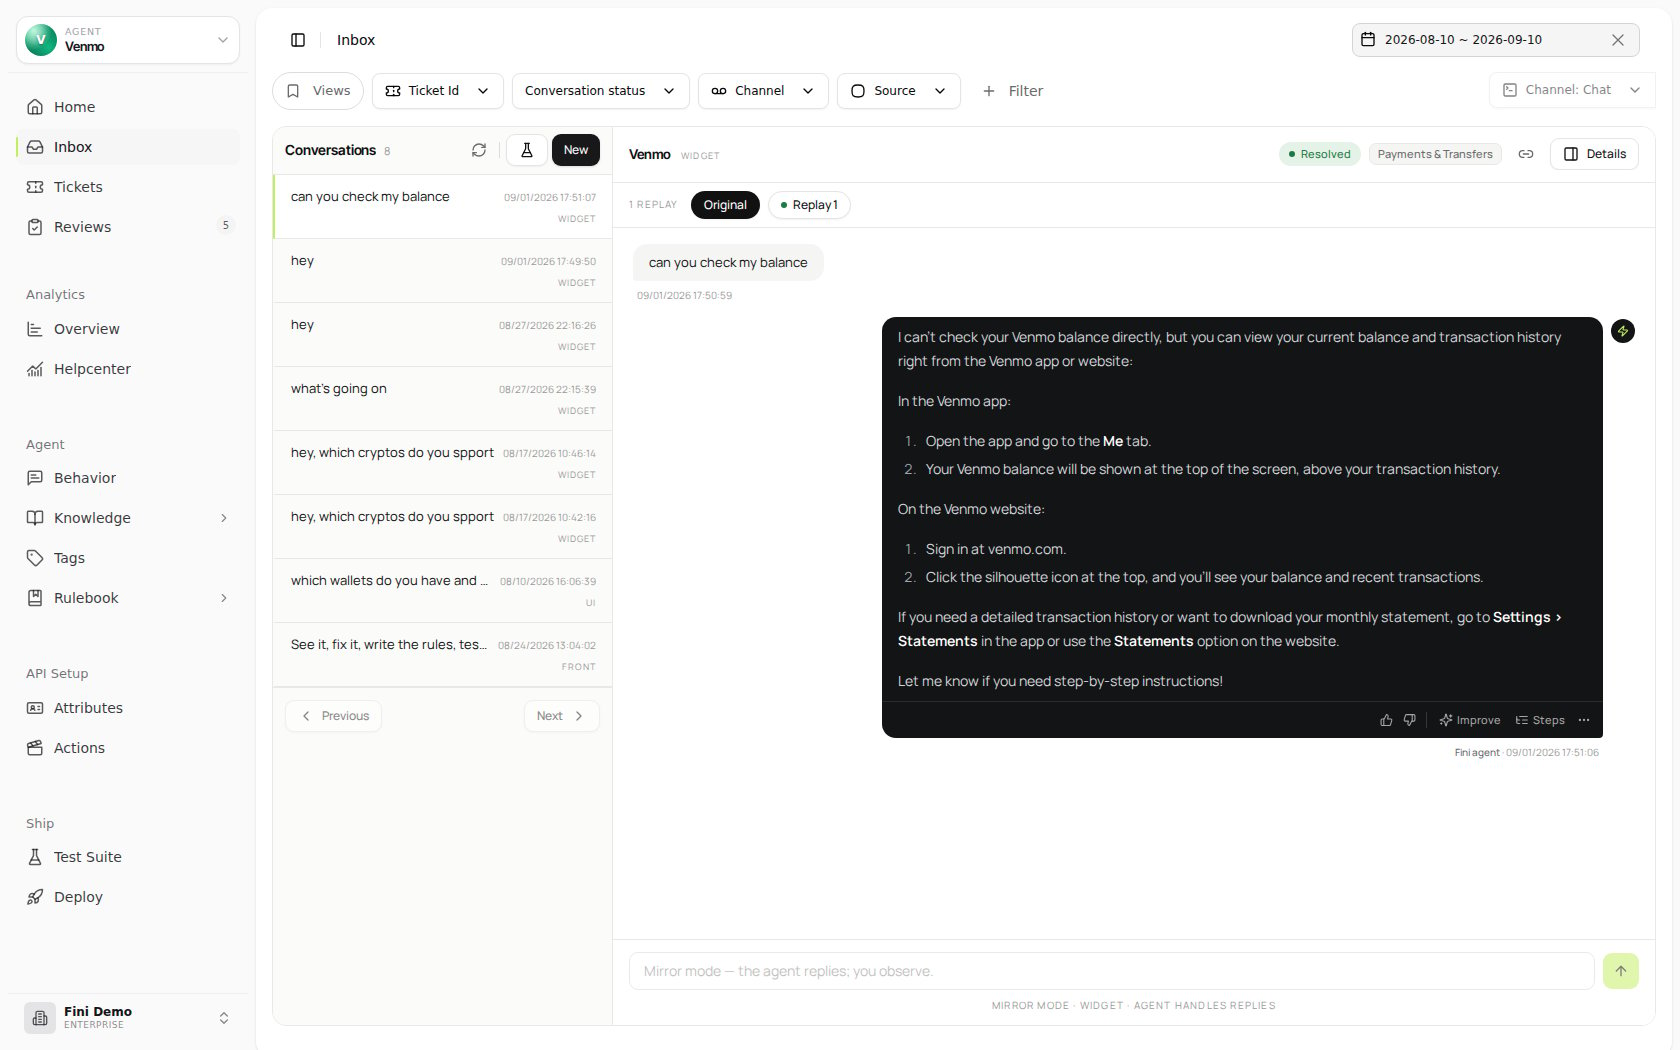 Use the **Channel** filter in Inbox to compare conversations per deployment. This is useful when the same agent runs on both Zendesk and the widget and you want to understand behavior differences by channel.
### Test Suite
Test suite runs test sets against the selected agent. See [Test Suite](/en/testing/test-suite).
### Analytics
Here you can scope metrics to the selected agent. See [Analytics](/en/analytics).
## What to configure next
Once an agent is selected, the next steps fall into three groups: what it knows, how it behaves, and where it runs.
### What the agent knows
Connect sources (URLs, files, Drive, Notion, Confluence, Zendesk), review and publish articles, and scope which articles this agent can see.
Bring in customer context — plan tier, order status, account flags — that the agent can reference when answering.
### How the agent behaves
Persona, tone, escalation triggers, and the instructions that shape how the agent reasons and responds.
Deterministic flows for high-leverage intents — order status, password reset, cancellation. The Rulebook runs before the LLM gets the question.
Reply-time controls: when to send, when to suppress, when to escalate, when to take an action.
Categorization for conversations — used by Analytics to slice volume by topic and by Rulebook to gate behavior.
### Where the agent runs
Connect the agent to Zendesk, Intercom, Front, Salesforce, the widget, your help center, or any of the other supported surfaces.
Validate the agent against scenarios before it goes live — and continuously after, as you change knowledge or prompts.
## Working across multiple agents
The same knowledge graph powers all your agents — articles are workspace-wide, and each agent's scope is controlled by attachment toggles on folders and articles. Don't duplicate articles to scope to an agent; toggle which folders the agent has access to. See [Articles](/en/knowledge/articles) for the full per-agent scoping model.
Agents can share knowledge, share Actions, share Attributes — but their prompts, rules, and reply behaviors are independent. That's the unit of separation: same data, different behavior.
## Related topics
- [Quickstart](/en/quickstart.md)
- [Slack](/en/deploy/slack.md)
- [Email](/en/deploy/email.md)
This documentation is built and hosted on [Mintlify](https://mintlify.com), a developer documentation platform.
Use the **Channel** filter in Inbox to compare conversations per deployment. This is useful when the same agent runs on both Zendesk and the widget and you want to understand behavior differences by channel.
### Test Suite
Test suite runs test sets against the selected agent. See [Test Suite](/en/testing/test-suite).
### Analytics
Here you can scope metrics to the selected agent. See [Analytics](/en/analytics).
## What to configure next
Once an agent is selected, the next steps fall into three groups: what it knows, how it behaves, and where it runs.
### What the agent knows
Connect sources (URLs, files, Drive, Notion, Confluence, Zendesk), review and publish articles, and scope which articles this agent can see.
Bring in customer context — plan tier, order status, account flags — that the agent can reference when answering.
### How the agent behaves
Persona, tone, escalation triggers, and the instructions that shape how the agent reasons and responds.
Deterministic flows for high-leverage intents — order status, password reset, cancellation. The Rulebook runs before the LLM gets the question.
Reply-time controls: when to send, when to suppress, when to escalate, when to take an action.
Categorization for conversations — used by Analytics to slice volume by topic and by Rulebook to gate behavior.
### Where the agent runs
Connect the agent to Zendesk, Intercom, Front, Salesforce, the widget, your help center, or any of the other supported surfaces.
Validate the agent against scenarios before it goes live — and continuously after, as you change knowledge or prompts.
## Working across multiple agents
The same knowledge graph powers all your agents — articles are workspace-wide, and each agent's scope is controlled by attachment toggles on folders and articles. Don't duplicate articles to scope to an agent; toggle which folders the agent has access to. See [Articles](/en/knowledge/articles) for the full per-agent scoping model.
Agents can share knowledge, share Actions, share Attributes — but their prompts, rules, and reply behaviors are independent. That's the unit of separation: same data, different behavior.
## Related topics
- [Quickstart](/en/quickstart.md)
- [Slack](/en/deploy/slack.md)
- [Email](/en/deploy/email.md)
This documentation is built and hosted on [Mintlify](https://mintlify.com), a developer documentation platform.