> ## Documentation Index
> Fetch the complete documentation index at: https://docs.usefini.com/llms.txt
> Use this file to discover all available pages before exploring further.
# Salesforce
> Connect Fini to Salesforce Service Cloud so your AI agent reads case context and posts replies on email cases as part of your support workflow.
Connect Fini to Salesforce so your AI agent can read incoming case emails and case comments, draft replies, and respond inside the Case timeline. Salesforce is the most setup-heavy of Fini's deploy integrations: in addition to the in-Fini connection step, you create a Connected App in your Salesforce org and (for the full integration) build two record-triggered Flows that send incoming events to Fini.
**Two deployment modes.**
* **Full Salesforce integration** (Fini replies on incoming Salesforce email cases): requires every step on this page, including the Connected App, custom case fields, Named Credentials, External Service, and two Salesforce Flows.
* **Widget-only deployment** (Salesforce is just a destination for conversations created by the Fini widget): only the in-Fini connect step is required. You can skip the [Manual Salesforce setup](#manual-salesforce-setup) section entirely. Configure the escalation under [Widget → Escalate to Salesforce](/en/deploy/widget#escalate-to-salesforce).
## Before you connect
You'll need:
* A **Salesforce account** with permission to create and install Connected Apps. Typically a System Administrator or a user with the *Customize Application* permission.
* An understanding of whether the target org is **production** or a **sandbox**. Sandbox orgs use a different OAuth login domain.
* A **Connected App** created in your Salesforce org. The Connected App provides the Consumer Key and Consumer Secret you'll paste into Fini.
* At least one **agent** already created in Fini. If you haven't created one yet, do that first from [Agent home](/en/configuration/agent-home).
### Create a Connected App in Salesforce
In your Salesforce org: **Setup → App Manager → New Connected App**. Configure these settings:
* Enable **OAuth Settings**.
* **Callback URL**: `https://api-prod.usefini.com/v2/integrations/salesforce/auth/callback`
* **Selected OAuth Scopes**: at minimum `Manage user data via APIs (api)`, `Access the identity URL service (id, profile, email, address, phone)`, and `Perform requests at any time (refresh_token, offline_access)`.
* If your org requires Proof Key for Code Exchange (PKCE) for OAuth authorization-code flows, leave that policy enabled. Fini sends the PKCE challenge automatically during authorization.
* Enable **Issue JSON Web Token (JWT)-based access tokens for named users** if your org's policy requires it.
Save the Connected App. After save, copy the **Consumer Key** and **Consumer Secret** from the API (Enable OAuth Settings) section. You'll paste them into Fini.
Salesforce sometimes takes 2 to 10 minutes to propagate a newly created Connected App. If your authorization fails immediately after creation with a "client identifier invalid" error, wait a few minutes and try again.
## What Fini does with your Salesforce
The OAuth scopes Fini requires are determined by the Connected App you create in your Salesforce org. Make sure the Connected App grants `api`, `id`, and `refresh_token`. The full list of side effects performed during and after authorization:
* **Read user info** (`organization_id`, `user_id`) to identify the connected org.
* **Describe the Case object** to discover existing custom fields.
* **Create two custom Case fields** if they don't already exist:
* `Fini_Skip_Webhook__c` (Checkbox): when checked on a case, Fini skips reply processing for that case.
* `Fini_Transfer__c` (Checkbox): set automatically by Fini when the agent escalates a case to a human agent.
* **Read incoming Email Messages and Case Comments** routed to Fini by the Salesforce Flows you create (see below).
* **Post replies as Email Messages or Case Comments** when a mapped agent decides to respond.
The custom field creation step requires that the user authorizing the Connected App has **Tooling API access**. If your authorizing user is on a profile that lacks Tooling API access (for example *Salesforce API Integration User*), the field creation will silently fail and you'll need to create them manually. See [If the custom fields are missing](#if-the-custom-fields-are-missing) below.
## Connect Salesforce in Fini
When you first open the Salesforce deploy page, the Connection Details panel asks for your Salesforce credentials.
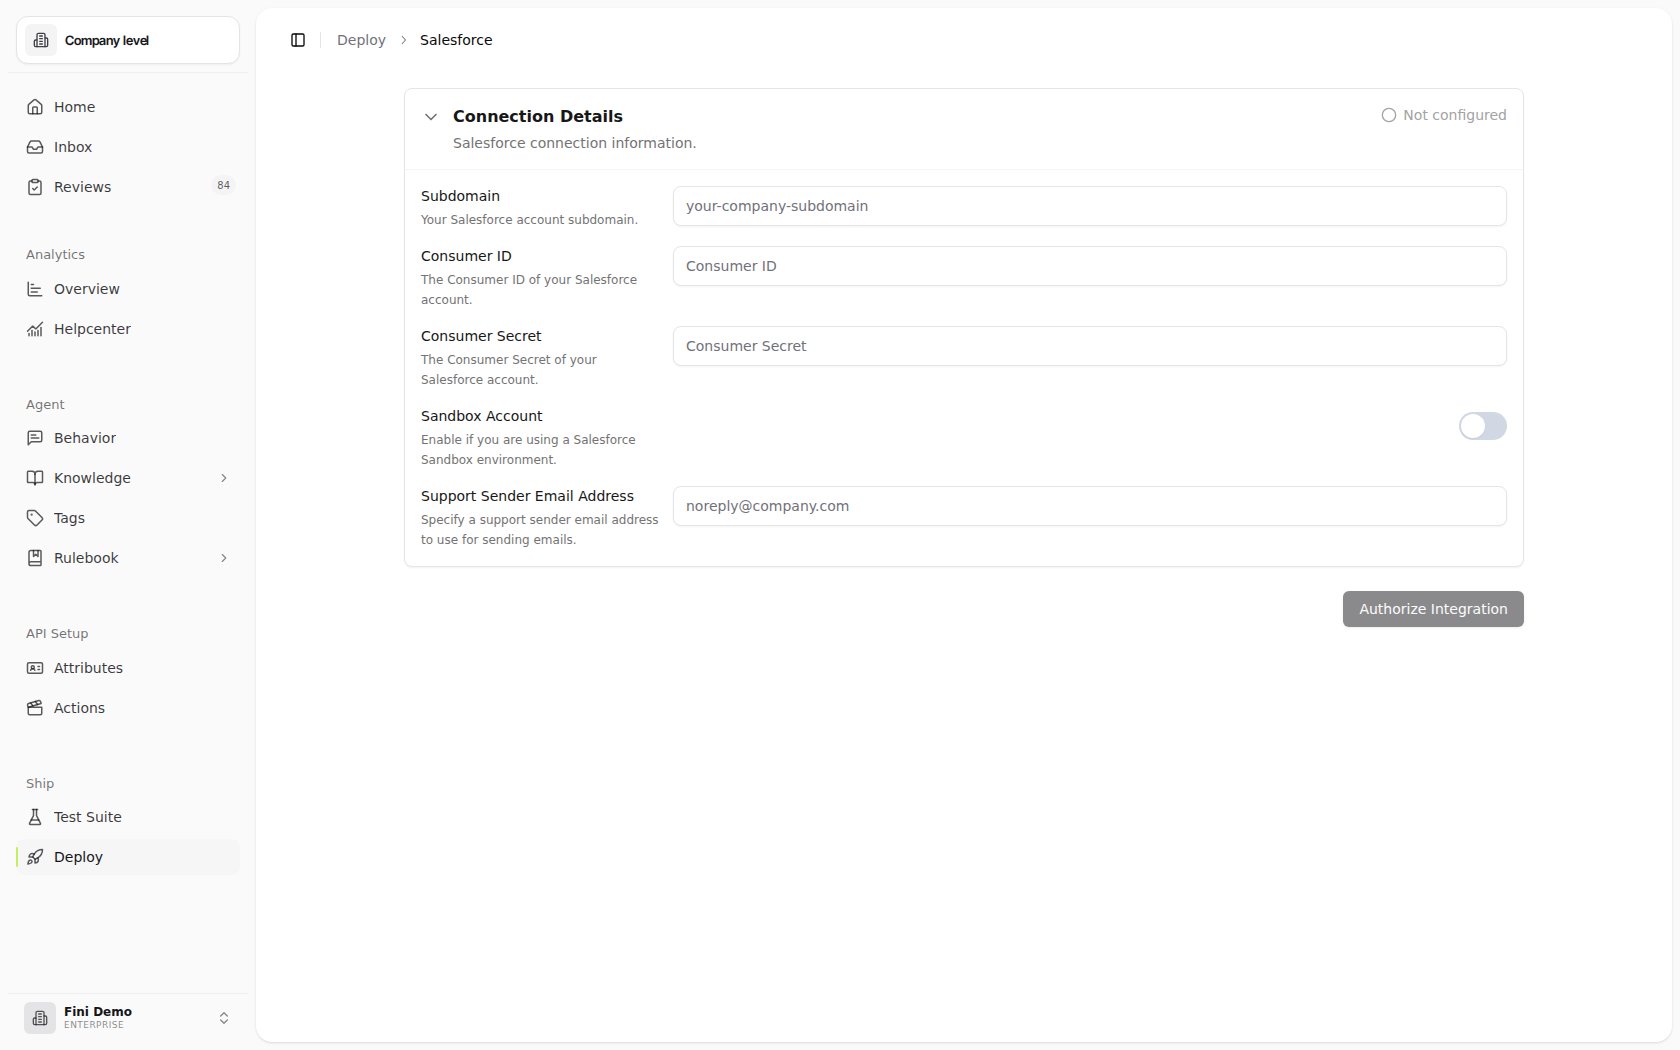 * **Subdomain**: your Salesforce instance subdomain (the part before `.my.salesforce.com` or `.salesforce.com`).
* **Consumer ID**: the Consumer Key from your Connected App.
* **Consumer Secret**: the Consumer Secret from your Connected App.
* **Sandbox Account**: enable the toggle if you're connecting a Salesforce Sandbox org. Leave off for production orgs.
* **Support Sender Email Address**: the email address Fini should use as the sender when posting replies. This stays editable after authorization.
A Salesforce login window opens at `login.salesforce.com` (or `test.salesforce.com` for sandboxes). Sign in with the user account you want Fini to act as. Approve the requested permissions.
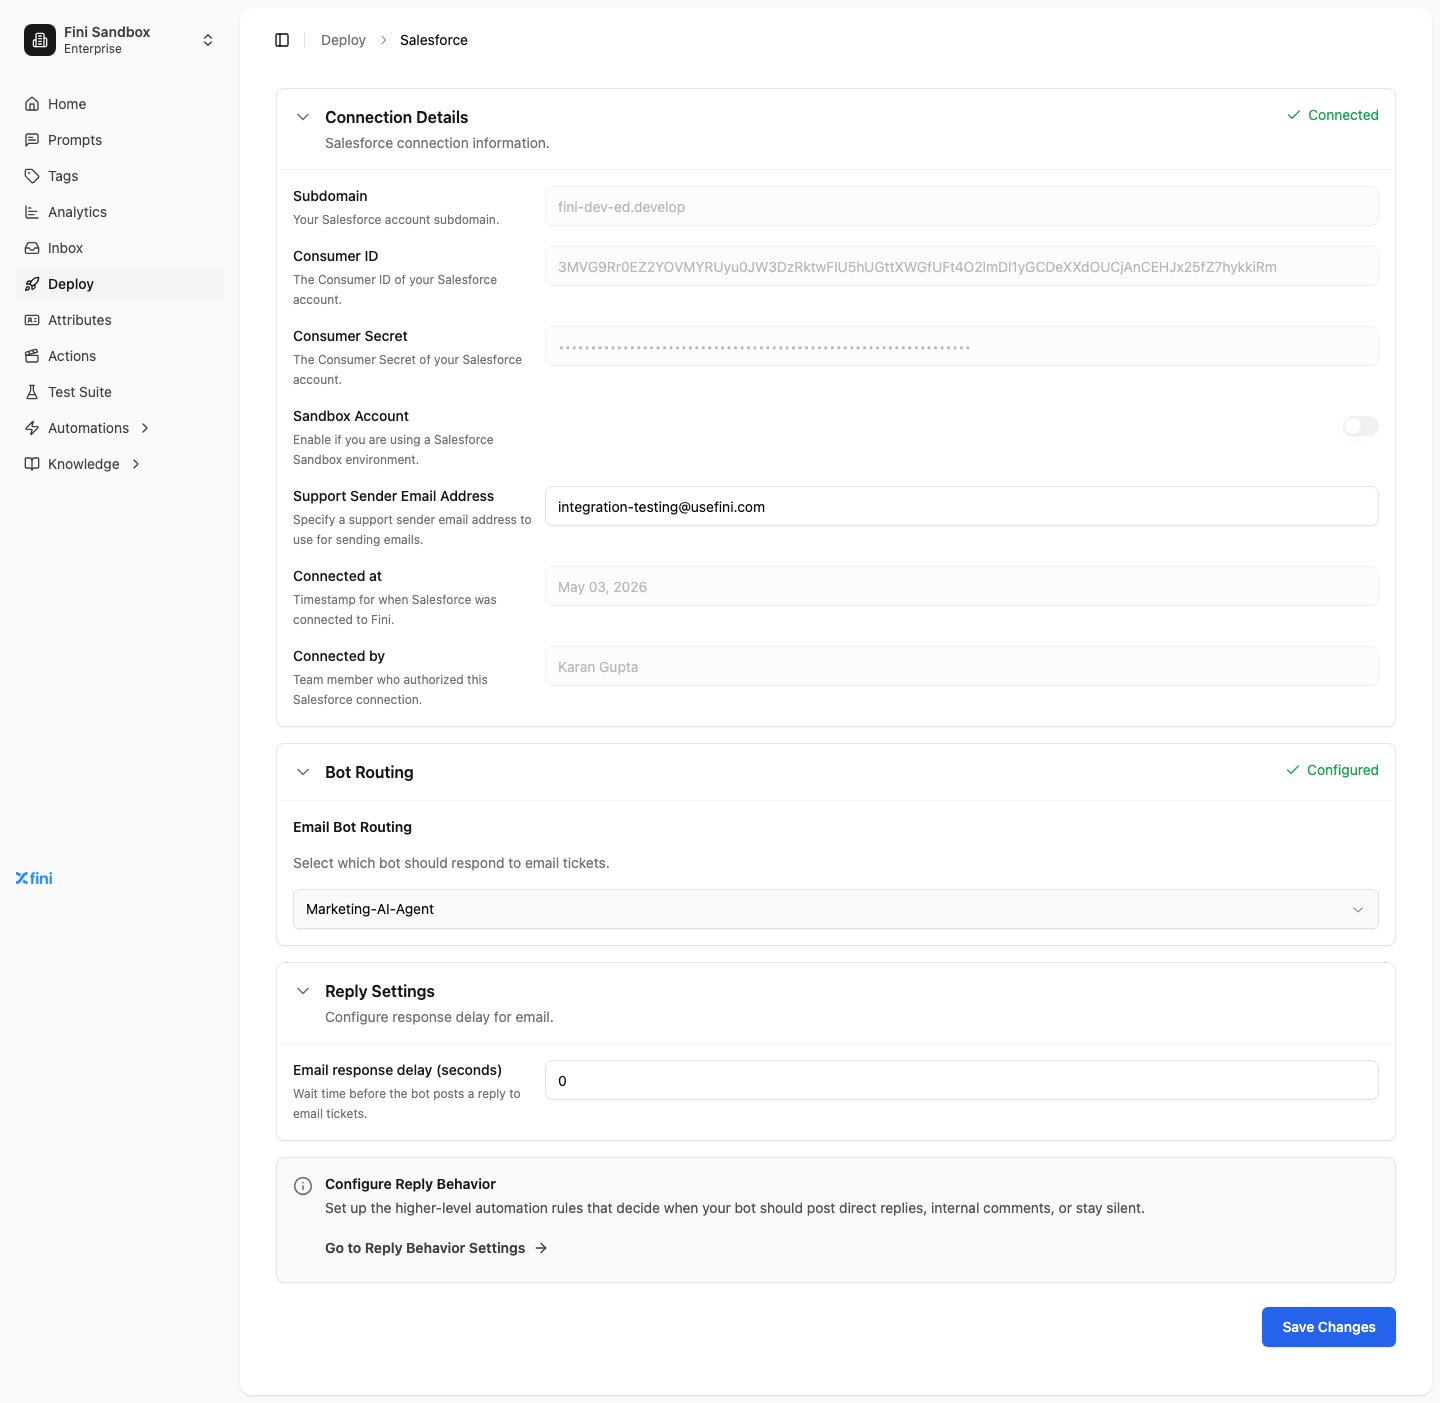
Once Salesforce redirects you back, the page expands to show your connection metadata and the Agent Routing and Reply Settings sections appear.
* **Subdomain**: your Salesforce instance subdomain (the part before `.my.salesforce.com` or `.salesforce.com`).
* **Consumer ID**: the Consumer Key from your Connected App.
* **Consumer Secret**: the Consumer Secret from your Connected App.
* **Sandbox Account**: enable the toggle if you're connecting a Salesforce Sandbox org. Leave off for production orgs.
* **Support Sender Email Address**: the email address Fini should use as the sender when posting replies. This stays editable after authorization.
A Salesforce login window opens at `login.salesforce.com` (or `test.salesforce.com` for sandboxes). Sign in with the user account you want Fini to act as. Approve the requested permissions.
Once Salesforce redirects you back, the page expands to show your connection metadata and the Agent Routing and Reply Settings sections appear.
 ## Configure your deployment
After connecting, three sections appear on the Salesforce deploy page. Each is independent.
### Connection Details
Read-only metadata about the integration (the credential fields lock once authorized):
* **Subdomain**, **Consumer ID**, **Consumer Secret**, **Sandbox Account**: the values you supplied. Locked.
* **Support Sender Email Address**: stays editable. Update it any time the email Fini sends from needs to change.
* **Connected at**: timestamp of the most recent successful authorization.
* **Connected by**: team member whose account authorized the integration.
To swap to a different Salesforce org, disconnect first (see [Troubleshooting](#troubleshooting)) and re-authorize.
### Agent Routing
Salesforce routing is **single agent, single channel**. Pick one Fini agent to handle all incoming email cases. There's no per-brand or per-inbox split, and no chat channel.
* **Email Agent Routing**: pick the Fini agent that should respond to Salesforce Email Messages and Case Comments.
### Reply Settings
Controls how long Fini waits before posting a reply.
* **Email response delay (seconds)**: wait time before the agent posts on case threads.
Setting `0` makes the agent reply as soon as it has an answer. Higher values give human agents a chance to take over first.
### Configure reply behavior
Reply Behavior decides *when* the agent posts a public Email Message versus an internal Case Comment versus stays silent. Click **Go to Reply Behavior Settings** on the Salesforce page to configure these rules. They apply across all channels, not just Salesforce.
## Manual Salesforce setup
**Skip this entire section if you're only using Salesforce as a destination for widget conversations.** The Flows below exist to forward incoming Salesforce events to Fini. If Fini isn't replying to incoming Salesforce traffic, no Flows are needed.
Salesforce doesn't expose webhooks the way Zendesk or HubSpot do. Instead, you set up two **record-triggered Flows** (one for new Email Messages, one for new Case Comments) that call into Fini via an External Service. The setup is mechanical but lengthy. Plan for 30 to 45 minutes the first time.
### Verify the custom fields are synced
After authorizing in Fini, open your Salesforce org and confirm the two custom Case fields exist.
In Salesforce: **Object Manager → Case → Fields & Relationships**. Look for:
| Field Label | API Name | Purpose |
| - | - | - |
| Fini Skip Webhook | `Fini_Skip_Webhook__c` | When checked on a case, Fini skips processing that case. |
| Fini Transfer | `Fini_Transfer__c` | Set automatically by Fini when escalating to a human agent. |
If both are present, skip ahead to [Make the fields visible to the Fini user profile](#make-the-fields-visible-to-the-fini-user-profile).
If either is missing, the authorizing user likely lacks Tooling API access. Create the fields manually as described next.
### If the custom fields are missing
Create both fields manually in **Object Manager → Case → Fields & Relationships → New**.
**Fini Skip Webhook:**
```
Field Label: Fini Skip Webhook
Field Name: Fini_Skip_Webhook
Data Type: Checkbox
Default Value: Unchecked (False)
Description: When checked, Fini skips reply processing for this case.
Required: No
```
**Fini Transfer:**
```
Field Label: Fini Transfer
Field Name: Fini_Transfer
Data Type: Checkbox
Default Value: Unchecked (False)
Description: Checked automatically when Fini escalates the case to a human agent.
Required: No
```
After creating both fields, ask the Fini engineering team to register them in the integration record on Fini's side (the `customTicketFields` map on the integration object). Without this registration, Fini will not know the fields exist and the skip/escalation behaviors will not work.
**Why this matters.** If `Fini_Skip_Webhook__c` and `Fini_Transfer__c` are not present in both Salesforce and Fini's integration record:
* Fini will reply to cases even when **Fini Skip Webhook** is checked on the case.
* Human agent handoff will not work: **Fini Transfer** won't get marked, and Fini may reply multiple times to the same user message because of job retries.
### Make the fields visible to the Fini user profile
Both fields exist, but they need to be readable by the Salesforce user Fini authenticates as.
For each field, in **Object Manager → Case → Fields & Relationships → \[field name] → Set Field-Level Security**, check the **Visible** box for the user profile Fini uses.
### Create the Named Credentials
Salesforce Named Credentials store the URL and authentication header Fini's webhook requires.
In Salesforce **Setup**, search for **Named Credentials** in Quick Find. Open the Named Credentials page.
Click **New External Credential**. Fill in:
* **Label**: `FiniExternalCredentials`
* **Authentication Protocol**: `Custom`
Under **Custom Headers**, click **Add Header**:
* **Key**: `x-fini-salesforce-api-key`
* **Value**: ask the Fini engineering team for the API key.
Save.
Click **New Named Credential**. Fill in:
* **Label**: `FiniWebhookSiteNamedCredentials`
* **URL**: `https://api-prod.usefini.com/v2/integrations/salesforce/ask-question`
* **Enabled for Callouts**: checked.
* **External Credentials**: select `FiniExternalCredentials` (the one you just created).
* **Generate Authorization Header**: checked.
Save.
### Create the External Service
The External Service exposes Fini's webhook to Salesforce Flows as a callable action.
In **Setup**, go to **External Services** and click **New External Service**.
* **Service Name**: `FiniWebhookSiteExternalService`
* **Creation Source**: *From API specification*
* **Named Credential**: `FiniWebhookSiteNamedCredentials`
* **Service Schema**: *Complete*
Paste this OpenAPI schema into the Service Schema field:
```json theme={null}
{
"openapi": "3.0.1",
"info": {
"title": "FiniStagingWebhookSiteExternalService",
"description": ""
},
"paths": {
"": {
"post": {
"description": "",
"operationId": "FiniWebhookSiteInvocableAction",
"requestBody": {
"description": "",
"content": {
"application/json": {
"schema": {
"type": "object",
"properties": {
"salesforceOrganizationId": { "type": "string" },
"caseId": { "type": "string" },
"webhookMessageId": { "type": "string" }
}
}
}
},
"required": true
},
"responses": {
"2XX": {
"description": "",
"content": {
"application/json": {
"schema": {
"type": "object",
"properties": {
"data": {
"type": "object",
"properties": {
"success": { "type": "boolean" }
}
},
"error": { "type": "string" }
}
}
}
}
}
}
}
}
}
}
```
Click **Next**, then **Save & Finish**.
### Create the Email Message Flow
This Flow forwards every newly created Email Message to Fini.
**Setup → Flows → New Flow → Record-Triggered Flow**.
* **Object**: Email Message
* **Trigger the Flow When**: Record is created
* **Set Entry Conditions**: None
* **Optimize the Flow for**: Action and Related Records
* Enable **Add Asynchronous Path**
On the Asynchronous path, add an **Assignment** node labeled `RequestBodyEmailMessage`.
Create a new variable resource:
* Resource Type: `variable`
* API Name: `requestBody`
* Data Type: `Apex-Defined`
* Apex class: `ExternalService__FiniWebhookSiteExternalService_FiniWebhookSiteInvocableAction_IN_body`
* Availability Outside the Flow: check **Available for input** and **Available for output**.
Add three assignments to `requestBody`:
| Field | Value |
| - | - |
| `caseId` | `{!$Record.ParentId}` |
| `webhookMessageId` | `{!$Record.Id}` |
| `salesforceOrganizationId` | `{!$Organization.Id}` |
On the Asynchronous path, add an **Action** node:
* Action group: External Services → `FiniWebhookSiteExternalService`
* Select **Fini Webhook Site Invocable Action**
* Label: `Fini Webhook Site Invocable Action`
* Body: `requestBody`
* Show Advanced Options: enable **Always continue in current transaction**
Save the Flow with the label `TriggerFiniForEmailMessage`. Activate it.
### Create the Case Comment Flow
This Flow does the same for Case Comments. The structure is identical to the Email Message Flow with two changes: the triggering object and the `caseId` value source.
**Setup → Flows → New Flow → Record-Triggered Flow**.
* **Object**: Case Comment
* **Trigger the Flow When**: Record is created
* **Set Entry Conditions**: None
* **Optimize the Flow for**: Action and Related Records
* Enable **Add Asynchronous Path**
Add an **Assignment** node labeled `RequestBody`. Use the same `requestBody` variable definition as in the Email Message Flow (Apex-Defined, same class).
Add three assignments:
| Field | Value |
| - | - |
| `caseId` | `{!$Record.Parent.Id}` |
| `webhookMessageId` | `{!$Record.Id}` |
| `salesforceOrganizationId` | `{!$Organization.Id}` |
Note that `caseId` uses `$Record.Parent.Id` here because Case Comment's parent is the Case (in the Email Message Flow it was `$Record.ParentId` because Email Message points at the Case directly).
Same as the Email Message Flow: External Services action calling `FiniWebhookSiteExternalService → FiniWebhookSiteInvocableAction`, body is `requestBody`, advanced option **Always continue in current transaction** enabled.
Save the Flow with the label `TriggerFiniForCaseComment`. Activate it.
## Verify it's working
1. From your Salesforce org, send a test email to the support address routed into Salesforce, or have a test contact reply to an existing case via email.
2. Wait the configured response delay, then open the case in Salesforce. The mapped Fini agent should have posted an Email Message or Case Comment.
3. If nothing appears, see [Troubleshooting](#troubleshooting).
## Troubleshooting
**Authorization failed with "client identifier invalid".** The Connected App was just created and Salesforce hasn't propagated it yet. Wait 5 to 10 minutes and try again.
**Authorization failed with "invalid\_grant".** Usually means the Sandbox toggle in Fini doesn't match the actual Salesforce environment (sandbox vs. production). Disconnect and reconnect with the correct toggle.
**Custom fields didn't get created during authorization.** The authorizing user lacks Tooling API access. Create the fields manually following [If the custom fields are missing](#if-the-custom-fields-are-missing), then have the engineering team register them in Fini's integration record.
**Fini isn't receiving Salesforce events.** Check:
1. Both Flows (`TriggerFiniForEmailMessage` and `TriggerFiniForCaseComment`) are **active**.
2. The External Credential's `x-fini-salesforce-api-key` header value is correct (ask the Fini engineering team).
3. The Named Credential URL is the production URL: `https://api-prod.usefini.com/v2/integrations/salesforce/ask-question`.
4. Check Salesforce **Setup → Flows → Paused and Failed Flow Interviews** for any failed runs with error details.
**The agent isn't replying even though events are reaching Fini.** Check, in order:
1. Is an agent selected in Agent Routing?
2. Is the agent enabled and trained?
3. Is the response delay much higher than expected?
4. Is `Fini_Skip_Webhook__c` checked on the case? (Agent will deliberately not reply.)
5. Are there [Reply Behavior](/en/automations/reply-behavior) rules that suppress replies on this channel?
## Related topics
- [Overview](/en/api-reference/attributes.md)
- [Widget](/en/deploy/widget.md)
- [Channel overview](/en/deploy/overview.md)
This documentation is built and hosted on [Mintlify](https://mintlify.com), a developer documentation platform.
## Configure your deployment
After connecting, three sections appear on the Salesforce deploy page. Each is independent.
### Connection Details
Read-only metadata about the integration (the credential fields lock once authorized):
* **Subdomain**, **Consumer ID**, **Consumer Secret**, **Sandbox Account**: the values you supplied. Locked.
* **Support Sender Email Address**: stays editable. Update it any time the email Fini sends from needs to change.
* **Connected at**: timestamp of the most recent successful authorization.
* **Connected by**: team member whose account authorized the integration.
To swap to a different Salesforce org, disconnect first (see [Troubleshooting](#troubleshooting)) and re-authorize.
### Agent Routing
Salesforce routing is **single agent, single channel**. Pick one Fini agent to handle all incoming email cases. There's no per-brand or per-inbox split, and no chat channel.
* **Email Agent Routing**: pick the Fini agent that should respond to Salesforce Email Messages and Case Comments.
### Reply Settings
Controls how long Fini waits before posting a reply.
* **Email response delay (seconds)**: wait time before the agent posts on case threads.
Setting `0` makes the agent reply as soon as it has an answer. Higher values give human agents a chance to take over first.
### Configure reply behavior
Reply Behavior decides *when* the agent posts a public Email Message versus an internal Case Comment versus stays silent. Click **Go to Reply Behavior Settings** on the Salesforce page to configure these rules. They apply across all channels, not just Salesforce.
## Manual Salesforce setup
**Skip this entire section if you're only using Salesforce as a destination for widget conversations.** The Flows below exist to forward incoming Salesforce events to Fini. If Fini isn't replying to incoming Salesforce traffic, no Flows are needed.
Salesforce doesn't expose webhooks the way Zendesk or HubSpot do. Instead, you set up two **record-triggered Flows** (one for new Email Messages, one for new Case Comments) that call into Fini via an External Service. The setup is mechanical but lengthy. Plan for 30 to 45 minutes the first time.
### Verify the custom fields are synced
After authorizing in Fini, open your Salesforce org and confirm the two custom Case fields exist.
In Salesforce: **Object Manager → Case → Fields & Relationships**. Look for:
| Field Label | API Name | Purpose |
| - | - | - |
| Fini Skip Webhook | `Fini_Skip_Webhook__c` | When checked on a case, Fini skips processing that case. |
| Fini Transfer | `Fini_Transfer__c` | Set automatically by Fini when escalating to a human agent. |
If both are present, skip ahead to [Make the fields visible to the Fini user profile](#make-the-fields-visible-to-the-fini-user-profile).
If either is missing, the authorizing user likely lacks Tooling API access. Create the fields manually as described next.
### If the custom fields are missing
Create both fields manually in **Object Manager → Case → Fields & Relationships → New**.
**Fini Skip Webhook:**
```
Field Label: Fini Skip Webhook
Field Name: Fini_Skip_Webhook
Data Type: Checkbox
Default Value: Unchecked (False)
Description: When checked, Fini skips reply processing for this case.
Required: No
```
**Fini Transfer:**
```
Field Label: Fini Transfer
Field Name: Fini_Transfer
Data Type: Checkbox
Default Value: Unchecked (False)
Description: Checked automatically when Fini escalates the case to a human agent.
Required: No
```
After creating both fields, ask the Fini engineering team to register them in the integration record on Fini's side (the `customTicketFields` map on the integration object). Without this registration, Fini will not know the fields exist and the skip/escalation behaviors will not work.
**Why this matters.** If `Fini_Skip_Webhook__c` and `Fini_Transfer__c` are not present in both Salesforce and Fini's integration record:
* Fini will reply to cases even when **Fini Skip Webhook** is checked on the case.
* Human agent handoff will not work: **Fini Transfer** won't get marked, and Fini may reply multiple times to the same user message because of job retries.
### Make the fields visible to the Fini user profile
Both fields exist, but they need to be readable by the Salesforce user Fini authenticates as.
For each field, in **Object Manager → Case → Fields & Relationships → \[field name] → Set Field-Level Security**, check the **Visible** box for the user profile Fini uses.
### Create the Named Credentials
Salesforce Named Credentials store the URL and authentication header Fini's webhook requires.
In Salesforce **Setup**, search for **Named Credentials** in Quick Find. Open the Named Credentials page.
Click **New External Credential**. Fill in:
* **Label**: `FiniExternalCredentials`
* **Authentication Protocol**: `Custom`
Under **Custom Headers**, click **Add Header**:
* **Key**: `x-fini-salesforce-api-key`
* **Value**: ask the Fini engineering team for the API key.
Save.
Click **New Named Credential**. Fill in:
* **Label**: `FiniWebhookSiteNamedCredentials`
* **URL**: `https://api-prod.usefini.com/v2/integrations/salesforce/ask-question`
* **Enabled for Callouts**: checked.
* **External Credentials**: select `FiniExternalCredentials` (the one you just created).
* **Generate Authorization Header**: checked.
Save.
### Create the External Service
The External Service exposes Fini's webhook to Salesforce Flows as a callable action.
In **Setup**, go to **External Services** and click **New External Service**.
* **Service Name**: `FiniWebhookSiteExternalService`
* **Creation Source**: *From API specification*
* **Named Credential**: `FiniWebhookSiteNamedCredentials`
* **Service Schema**: *Complete*
Paste this OpenAPI schema into the Service Schema field:
```json theme={null}
{
"openapi": "3.0.1",
"info": {
"title": "FiniStagingWebhookSiteExternalService",
"description": ""
},
"paths": {
"": {
"post": {
"description": "",
"operationId": "FiniWebhookSiteInvocableAction",
"requestBody": {
"description": "",
"content": {
"application/json": {
"schema": {
"type": "object",
"properties": {
"salesforceOrganizationId": { "type": "string" },
"caseId": { "type": "string" },
"webhookMessageId": { "type": "string" }
}
}
}
},
"required": true
},
"responses": {
"2XX": {
"description": "",
"content": {
"application/json": {
"schema": {
"type": "object",
"properties": {
"data": {
"type": "object",
"properties": {
"success": { "type": "boolean" }
}
},
"error": { "type": "string" }
}
}
}
}
}
}
}
}
}
}
```
Click **Next**, then **Save & Finish**.
### Create the Email Message Flow
This Flow forwards every newly created Email Message to Fini.
**Setup → Flows → New Flow → Record-Triggered Flow**.
* **Object**: Email Message
* **Trigger the Flow When**: Record is created
* **Set Entry Conditions**: None
* **Optimize the Flow for**: Action and Related Records
* Enable **Add Asynchronous Path**
On the Asynchronous path, add an **Assignment** node labeled `RequestBodyEmailMessage`.
Create a new variable resource:
* Resource Type: `variable`
* API Name: `requestBody`
* Data Type: `Apex-Defined`
* Apex class: `ExternalService__FiniWebhookSiteExternalService_FiniWebhookSiteInvocableAction_IN_body`
* Availability Outside the Flow: check **Available for input** and **Available for output**.
Add three assignments to `requestBody`:
| Field | Value |
| - | - |
| `caseId` | `{!$Record.ParentId}` |
| `webhookMessageId` | `{!$Record.Id}` |
| `salesforceOrganizationId` | `{!$Organization.Id}` |
On the Asynchronous path, add an **Action** node:
* Action group: External Services → `FiniWebhookSiteExternalService`
* Select **Fini Webhook Site Invocable Action**
* Label: `Fini Webhook Site Invocable Action`
* Body: `requestBody`
* Show Advanced Options: enable **Always continue in current transaction**
Save the Flow with the label `TriggerFiniForEmailMessage`. Activate it.
### Create the Case Comment Flow
This Flow does the same for Case Comments. The structure is identical to the Email Message Flow with two changes: the triggering object and the `caseId` value source.
**Setup → Flows → New Flow → Record-Triggered Flow**.
* **Object**: Case Comment
* **Trigger the Flow When**: Record is created
* **Set Entry Conditions**: None
* **Optimize the Flow for**: Action and Related Records
* Enable **Add Asynchronous Path**
Add an **Assignment** node labeled `RequestBody`. Use the same `requestBody` variable definition as in the Email Message Flow (Apex-Defined, same class).
Add three assignments:
| Field | Value |
| - | - |
| `caseId` | `{!$Record.Parent.Id}` |
| `webhookMessageId` | `{!$Record.Id}` |
| `salesforceOrganizationId` | `{!$Organization.Id}` |
Note that `caseId` uses `$Record.Parent.Id` here because Case Comment's parent is the Case (in the Email Message Flow it was `$Record.ParentId` because Email Message points at the Case directly).
Same as the Email Message Flow: External Services action calling `FiniWebhookSiteExternalService → FiniWebhookSiteInvocableAction`, body is `requestBody`, advanced option **Always continue in current transaction** enabled.
Save the Flow with the label `TriggerFiniForCaseComment`. Activate it.
## Verify it's working
1. From your Salesforce org, send a test email to the support address routed into Salesforce, or have a test contact reply to an existing case via email.
2. Wait the configured response delay, then open the case in Salesforce. The mapped Fini agent should have posted an Email Message or Case Comment.
3. If nothing appears, see [Troubleshooting](#troubleshooting).
## Troubleshooting
**Authorization failed with "client identifier invalid".** The Connected App was just created and Salesforce hasn't propagated it yet. Wait 5 to 10 minutes and try again.
**Authorization failed with "invalid\_grant".** Usually means the Sandbox toggle in Fini doesn't match the actual Salesforce environment (sandbox vs. production). Disconnect and reconnect with the correct toggle.
**Custom fields didn't get created during authorization.** The authorizing user lacks Tooling API access. Create the fields manually following [If the custom fields are missing](#if-the-custom-fields-are-missing), then have the engineering team register them in Fini's integration record.
**Fini isn't receiving Salesforce events.** Check:
1. Both Flows (`TriggerFiniForEmailMessage` and `TriggerFiniForCaseComment`) are **active**.
2. The External Credential's `x-fini-salesforce-api-key` header value is correct (ask the Fini engineering team).
3. The Named Credential URL is the production URL: `https://api-prod.usefini.com/v2/integrations/salesforce/ask-question`.
4. Check Salesforce **Setup → Flows → Paused and Failed Flow Interviews** for any failed runs with error details.
**The agent isn't replying even though events are reaching Fini.** Check, in order:
1. Is an agent selected in Agent Routing?
2. Is the agent enabled and trained?
3. Is the response delay much higher than expected?
4. Is `Fini_Skip_Webhook__c` checked on the case? (Agent will deliberately not reply.)
5. Are there [Reply Behavior](/en/automations/reply-behavior) rules that suppress replies on this channel?
## Related topics
- [Overview](/en/api-reference/attributes.md)
- [Widget](/en/deploy/widget.md)
- [Channel overview](/en/deploy/overview.md)
This documentation is built and hosted on [Mintlify](https://mintlify.com), a developer documentation platform.