> ## Documentation Index
> Fetch the complete documentation index at: https://docs.usefini.com/llms.txt
> Use this file to discover all available pages before exploring further.

# Widget

> Embed Fini as a native chat widget or as a standalone support panel on your website, inside your authenticated app, or in your mobile apps. The same widget runs in every context, same bot, same configuration, same agent behavior. You can configure its appearance, prompts, references, and escalation destination from Fini.

The Fini chat widget puts your Fini AI agent in a chat panel on your public website, inside your authenticated web app, in your iOS and Android apps, or on your help center, all from one embed snippet and one bot configuration. When the agent can't resolve a conversation, the widget escalates it to your helpdesk as a real ticket: Zendesk, Front, Gorgias, Salesforce, and HubSpot are supported destinations.

The Fini widget is a chat experience your customers can use directly on your website, app, or help center. Drop a small JavaScript snippet into your site, choose whether the widget opens as a floating corner bubble or renders as a standalone inline panel, and manage the bot, branding, suggested questions, reference links, and escalation destination from Fini.

For logged-in users, you can identify the user to the bot via a signed JWT so the agent answers with full context: who they are, what plan they're on, what account they belong to.

## Where the widget runs

<CardGroup cols={2}>
  <Card title="Your public website" icon="globe">
    Anonymous visitors and prospects. Drop the snippet into any page; no authentication required.
  </Card>

  <Card title="Your authenticated web app" icon="lock">
    Logged-in customers. Pass a signed JWT so the agent knows who's asking and personalizes the response with the user's attributes.
  </Card>

  <Card title="iOS and Android" icon="mobile-screen">
    Native mobile apps. Same widget, same configuration, talk to your Fini contact for the current iOS and Android embedding setup.
  </Card>

  <Card title="Your help center" icon="book-open">
    A complement to the standalone help center surface. Embed the widget on docs pages so readers can ask the agent without leaving the article.
  </Card>

  <Card title="A standalone support route" icon="window-maximize">
    An inline panel for pages where chat should be the main experience, such as `/support`.
  </Card>
</CardGroup>

## Before you create your widget

You'll need:

* At least one **bot** already created in Fini and trained on your knowledge. Each widget is tied to one bot; the bot can't be changed after creation. Create the bot first from the [home page](/en/configuration/agent-home).
* The **domain(s)** where the widget will live (for example, `https://yourcompany.com`, `app.yourcompany.com`, or wildcards like `*.yourcompany.com`). Each widget can serve multiple domains.
* (Optional) A connected helpdesk integration if you want widget conversations to escalate to a human ticket. Today the supported destinations are [Zendesk](#escalate-to-your-helpdesk), [Front](#escalate-to-your-helpdesk), [Gorgias](#escalate-to-your-helpdesk), [Salesforce](#escalate-to-your-helpdesk), and [HubSpot](#escalate-to-your-helpdesk). Connect the destination integration first under [Deploy](/en/deploy/overview).

## Create your widget

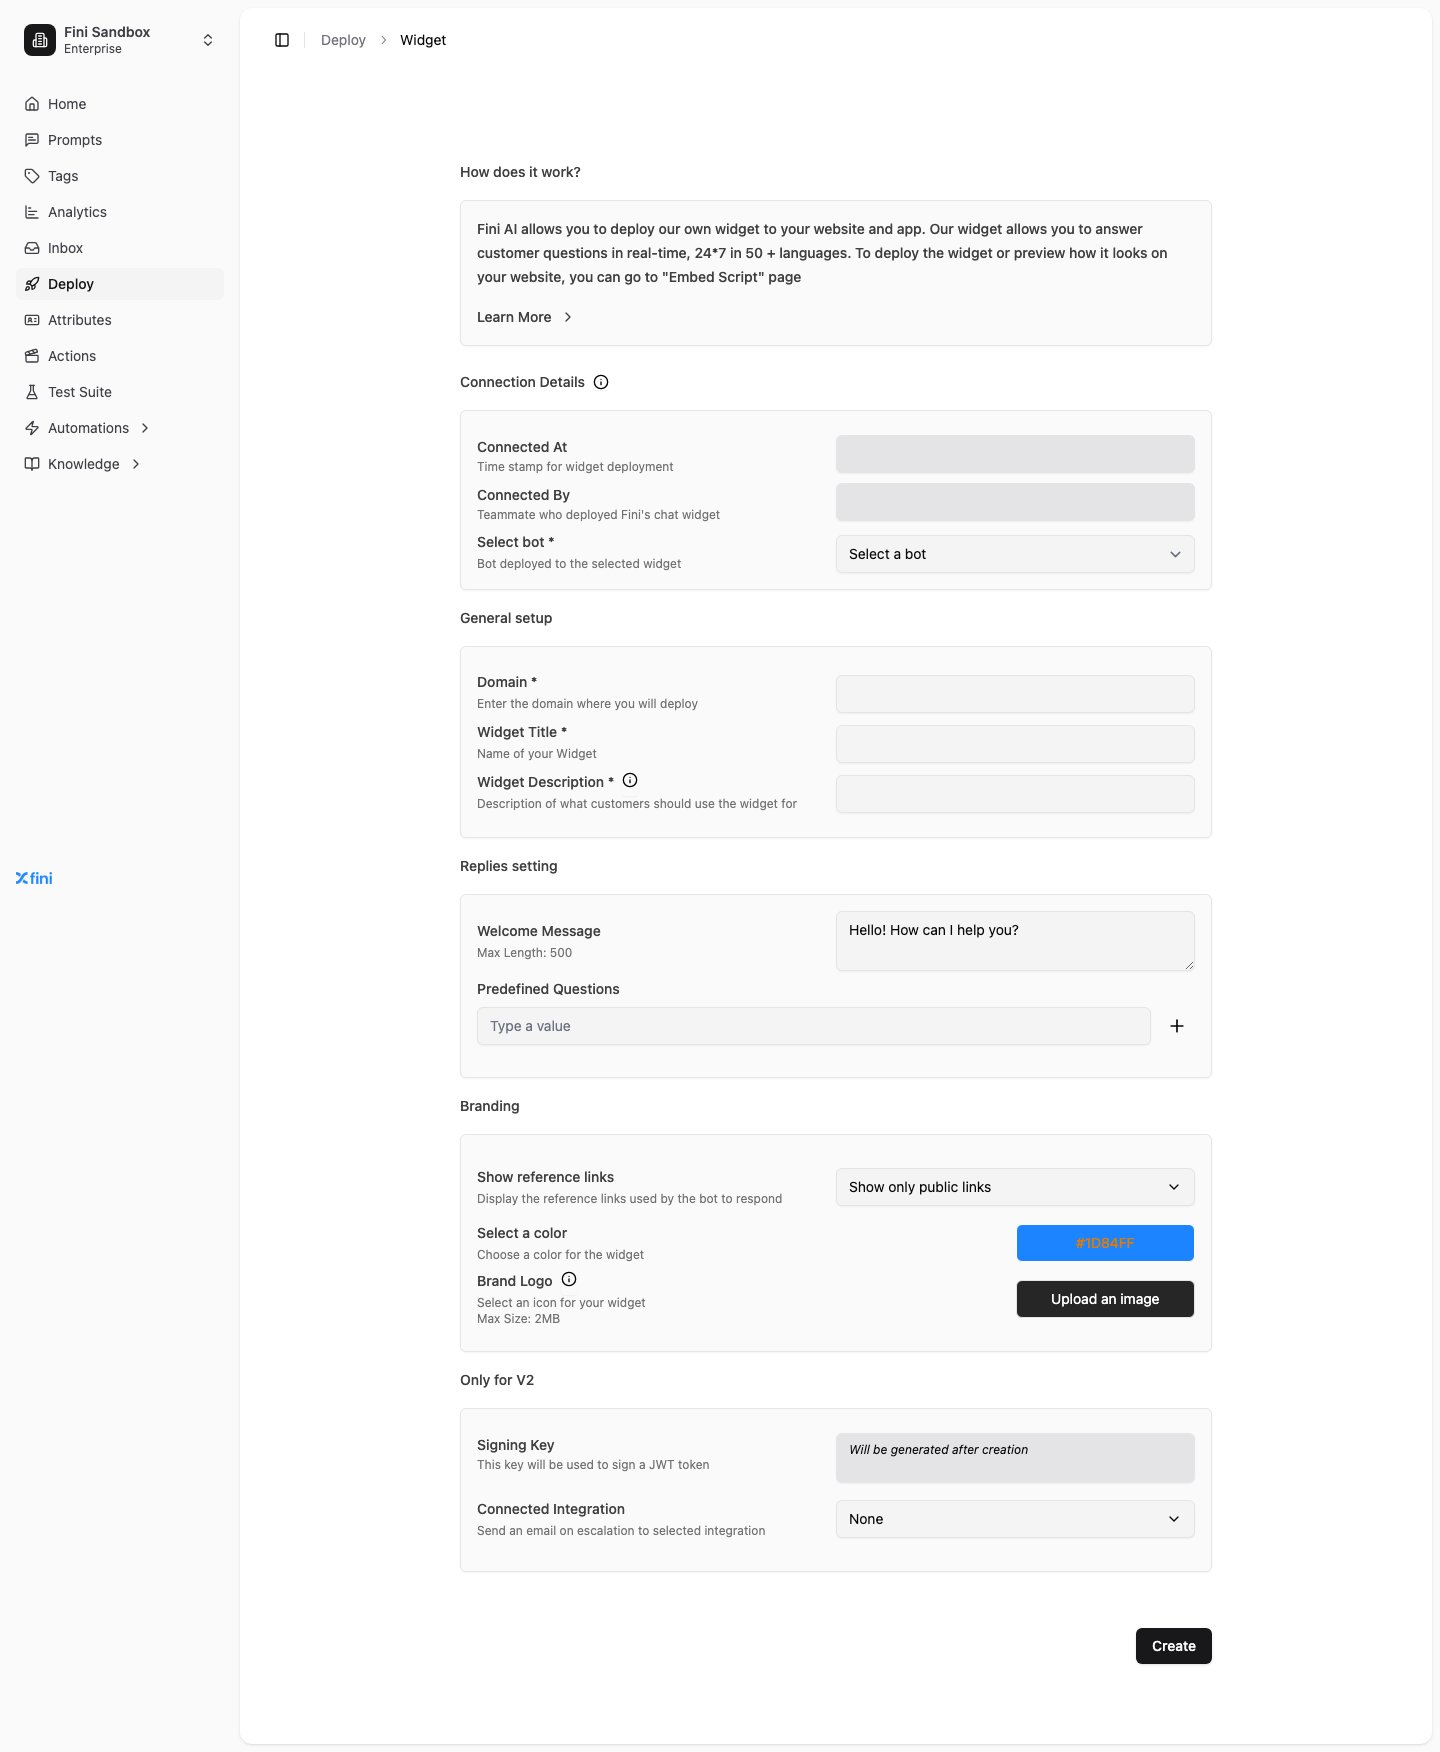
Open **Deploy → Widget** in Fini. If no widget exists yet, the creation form opens directly; if one or more widgets already exist, pick **Create new** from the top-right.
<Frame>
  <img src="https://mintcdn.com/fini/zctNPVP1t-q6dPqV/images/en/deploy/widget/creation.png?fit=max&auto=format&n=zctNPVP1t-q6dPqV&q=85&s=809aa8e5e9d6a477d6e69ae46d4ac3db" alt="Widget deploy page in creation mode, showing the empty form" width="1440" height="1752" data-path="images/en/deploy/widget/creation.png" />
</Frame>

<Steps>
  <Step title="Pick the bot">
    From the **Select bot** dropdown, choose which Fini bot will answer questions in this widget. Each widget is bound to one bot; once you create the widget you cannot swap the bot, create a new widget instead.
  </Step>

  <Step title="Fill in the basics">
    * **Domain**: the URL(s) where the widget will be embedded. Multi-domain widgets are supported, enter one domain per line. Wildcards work (e.g., `*.yourcompany.com` to cover every subdomain).
    * **Widget title**: the name shown in the widget header.
  </Step>

  <Step title="Click Create">
    The widget is provisioned. The page switches to the two-tab view: **Embed Script** and **Settings**.
  </Step>
</Steps>

## Embed it on your site

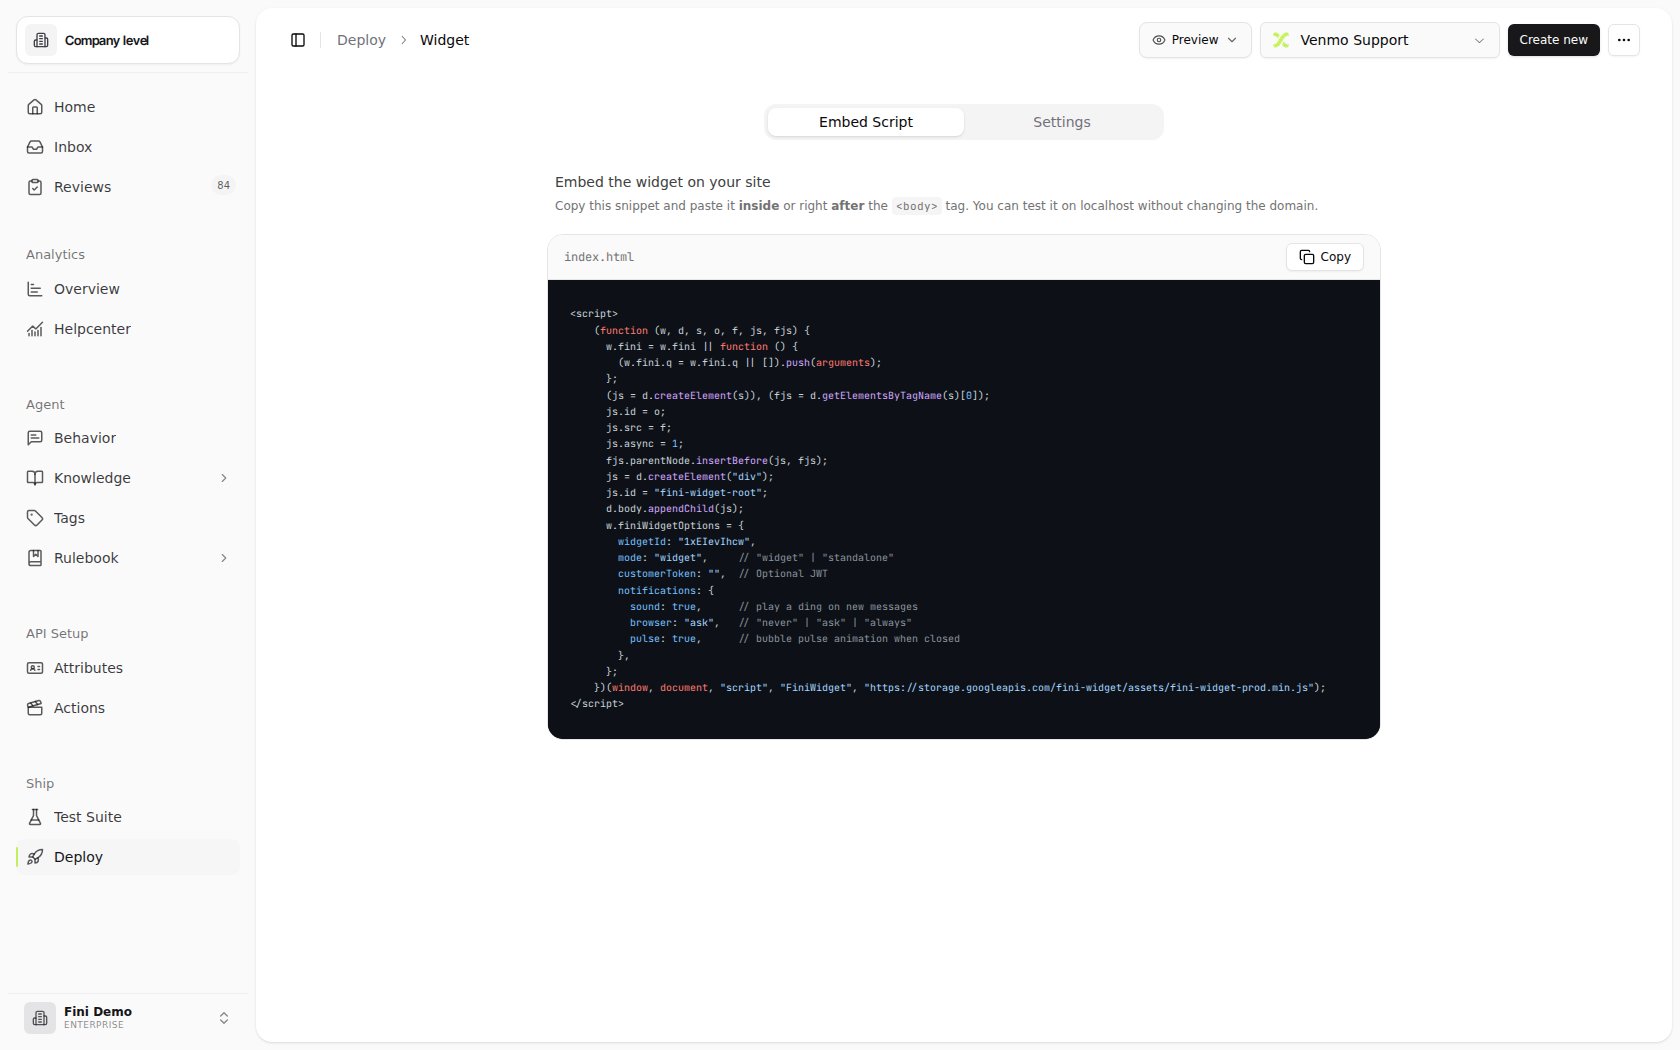
The **Embed Script** tab gives you a JavaScript snippet to paste into your site's HTML.
<Frame>
  <img src="https://mintcdn.com/fini/zctNPVP1t-q6dPqV/images/en/deploy/widget/embed-script.png?fit=max&auto=format&n=zctNPVP1t-q6dPqV&q=85&s=43892be9a036d39b0212fbc679fca179" alt="The Widget page on the Embed Script tab, showing the script snippet inside a dark code panel with the widget id field masked. The page header explains where to paste the snippet, with notes that it must go inside or after the body tag and that localhost works for testing without changing the domain. A Copy button sits below the snippet, with Preview and Delete actions in the top-right of the page." width="1680" height="1050" data-path="images/en/deploy/widget/embed-script.png" />
</Frame>

The snippet looks like this (with your widget id substituted in):

```html theme={null}
<script>
      (function (w, d, s, o, f, js, fjs) {
        w.fini = w.fini || function () {
          (w.fini.q = w.fini.q || []).push(arguments);
        };
        (js = d.createElement(s)), (fjs = d.getElementsByTagName(s)[0]);
        js.id = o;
        js.src = f;
        js.async = 1;
        fjs.parentNode.insertBefore(js, fjs);
        js = d.createElement("div");
        js.id = "fini-widget-root";
        d.body.appendChild(js);
        w.finiWidgetOptions = {
          widgetId: "YOUR_WIDGET_ID",
          mode: "widget",     // "widget" = bubble in the corner, "standalone" = inline chat panel
          customerToken: "",  // optional JWT, see "Identify logged-in users" below
          notifications: {
            sound: true,      // play a ding on new messages
            browser: "ask",   // "never" | "ask" | "always"
            pulse: true,      // bubble pulse animation when closed
          },
        };
      })(window, document, "script", "FiniWidget", "https://storage.googleapis.com/fini-widget/assets/fini-widget-prod.min.js");
  </script>
```

<Steps>
  <Step title="Click Copy">
    The **Copy** button puts the entire snippet on your clipboard.
  </Step>

  <Step title="Paste it into your site">
    Paste the snippet inside or just after the closing `</body>` tag of every page where you want the widget. Most teams put it in a global layout template or footer partial so it shows up site-wide.
  </Step>

  <Step title="Preview before going live">
    Use the **Preview** dropdown above the snippet to open a preview window without deploying. A new browser window opens with the widget rendered against your live bot.
  </Step>
</Steps>

<Note>
  The widget works on `localhost` without a domain match, you can test locally before configuring the production domain. For production, the live domain you embed on must match one of the entries in the widget's **Domain** field.
</Note>

<Tip>
  The **Preview** dropdown is the fastest way to see the actual rendered widget, your brand color, logo, and configured greeting, without having to embed the snippet anywhere. Use it before going live and after every Settings change to confirm the experience looks right.
</Tip>

### Widget modes

The `mode` option in the embed snippet controls how the widget renders:

<CardGroup cols={2}>
  <Card title="mode: &#x22;widget&#x22;" icon="comment">
    Bubble in the corner of the page. The default. Users click to open the chat; the widget collapses when minimized.
  </Card>

  <Card title="mode: &#x22;standalone&#x22;" icon="window-maximize">
    Inline chat panel that fills its parent container. Useful when you want the chat as a first-class element on the page (a dedicated /support route, for example) rather than a floating bubble.
  </Card>
</CardGroup>

If you omit `mode`, the widget uses the floating bubble behavior.

### Opening, closing, and starting again

In `widget` mode, Fini renders a floating button in the bottom-right corner of the page.

* When the widget is closed, the button shows your brand logo.
* When the widget is open, the button switches to a close icon.
* Clicking the button toggles the panel open or closed.
* The open and close transition scales the panel in and out from the button.

Once a conversation has started, the widget header shows the widget title, description, logo, and a **Start Again** button. **Start Again** clears the current conversation, message draft, loading state, and any displayed error. It is disabled while the agent is actively responding.

In `standalone` mode, there is no floating launcher. The chat panel renders inline where the snippet is mounted, so the host page controls where the panel appears.

### SDK controls

The widget exposes a small customer-side SDK through `window.fini`. The embed snippet creates a queue so you can call SDK commands before the widget bundle has fully loaded.

Use SDK commands when your product UI needs to control the widget directly:

```javascript theme={null}
fini("open");
fini("close");
fini("sendMessage", "How do I reset my PIN?");
```

What each command does:

<ResponseField name="fini(&#x22;open&#x22;)" type="function">
  Opens the floating widget panel.
</ResponseField>

<ResponseField name="fini(&#x22;close&#x22;)" type="function">
  Closes the floating widget panel.
</ResponseField>

<ResponseField name="fini(&#x22;sendMessage&#x22;, message)" type="function">
  Opens the widget and sends `message` as the customer's next question. Use this when a button, search result, or in-product prompt should start a conversation automatically.
</ResponseField>

You can also subscribe to widget events:

```javascript theme={null}
fini("on", "open", () => {
  // Runs whenever the widget opens.
});
fini("on", "close", () => {
  // Runs whenever the widget closes.
});
fini("on", "sendMessage", (message) => {
  // Runs whenever a message is sent through the widget SDK.
});
```

Use subscriptions for analytics, product instrumentation, or custom UI side effects. For example, you can track when customers open the widget from a billing page, close it, or trigger a pre-filled support question from your own interface.

### Answer rendering

Widget answers render Markdown. The same answer renderer is used in the floating widget, standalone widget, and main embedded widget surfaces.

The widget supports common Markdown patterns including paragraphs, links, bulleted and numbered lists, inline code, fenced code blocks, and GitHub-flavored Markdown tables. This lets the agent return structured troubleshooting steps, comparison tables, and code snippets without losing formatting in the chat UI.

<Tip>
  Keep tables and code blocks compact. They render inside the chat panel and can scroll horizontally when needed, but short labels and concise examples are easier for customers to read.
</Tip>

### Loading and notification states

While the agent is responding, the widget shows a loading state:

* The send button switches from the send icon to a spinner.
* The assistant message area shows a pulsing skeleton loader.
* The bot logo pulses while the answer is being generated.
* The input is guarded so customers cannot submit another message while a response is in progress.

The widget can also notify customers when a new answer arrives and the widget is not the active focus:

* **Browser notifications** show a native browser notification when supported and allowed by the customer.
* **Sound notifications** play an audio cue for new widget activity when enabled.
* **Pulse notifications** visually pulse the launcher so the customer can see that a new message is waiting.

Browser notifications depend on the customer's browser permission. If the customer blocks notifications, the widget still uses in-page visual states such as pulsing and loading indicators.

### Customer implementation checklist

Customers do not need to build their own loading UI. Loading states are handled by the widget bundle after the embed script is installed:

1. Paste the widget snippet on the page.
2. Pass the correct `widgetId`.
3. Set `mode` to `widget` or `standalone`.
4. Configure notification behavior in `finiWidgetOptions.notifications`.

Notification configuration lives in the customer-side script:

```javascript theme={null}
notifications: {
  sound: true,
  browser: "ask",
  pulse: true,
}
```

For browser notifications:

1. Serve the page over HTTPS. Browser notifications generally require a secure origin.
2. Set `notifications.browser` to `"ask"` or `"always"`.
3. Let the widget request notification permission when the customer interacts with it.
4. If the customer blocks browser notifications, ask them to re-enable notifications from their browser's site settings.

For sound notifications:

1. Set `notifications.sound` to `true`.
2. Make sure the widget is loaded on pages where sound is acceptable for your customer experience.
3. Remember that browsers may block sound until the customer has interacted with the page.

For pulse notifications:

1. Set `notifications.pulse` to `true`.
2. Use `mode: "widget"` if you want the floating launcher to pulse for new activity.
3. Use `mode: "standalone"` when the chat is always visible; in that mode, the page itself controls where the panel appears.

<Note>
  If you are using a custom Content Security Policy, allow the widget script from `storage.googleapis.com` and any browser APIs required by your notification policy. Overly strict script, media, or notification policies can prevent sound or browser notifications from working.
</Note>

### Page URL tracking

Fini can record the URL of the page where each widget message is sent. This helps your team understand where a customer was when they asked a question, and gives the agent more page context when reviewing the conversation.

Customers do not pass the page URL manually in the embed snippet. Turn it on from **Widget Settings → Advanced → Track current page URL**. When enabled, the widget captures the current browser URL automatically for messages sent from that page.

Use this when the same widget appears across product pages, account pages, help center articles, or checkout flows and you want analytics or conversation review to include the page source.

## Identify logged-in users

When you're embedding the widget inside an authenticated experience (your web app, your mobile app, your customer portal), you can tell the bot who the user is by passing a signed **JWT** as the `customerToken`. The bot then has access to the user's email, name, and any custom attributes you include, so it can answer questions like "what plan am I on?" without asking the user to repeat themselves.

### Payload shape

Sign a JWT on your server with this payload structure:

```json theme={null}
{
  "email": "user@example.com",
  "name": "Jane Doe",
  "collectEmail": true,
  "platform": "web",
  "user_attributes": {
    "userId": "USR-12345",
    "plan": "pro",
    "accountType": "enterprise"
  }
}
```

What each field does:

<ResponseField name="email" type="string">
  The user's email address. The agent uses this for personalization and can pass it through to helpdesk tickets on escalation.
</ResponseField>

<ResponseField name="name" type="string">
  The user's display name. Shown in conversation context and used in greeting personalization.
</ResponseField>

<ResponseField name="collectEmail" type="boolean">
  Whether the widget should ask the user to confirm their email before starting the conversation. Set `false` when you already have a verified email from your auth system; set `true` when you want a confirmation step regardless.
</ResponseField>

<ResponseField name="platform" type="&#x22;web&#x22; | &#x22;mobile&#x22;">
  The surface the conversation is happening on. Pass `"web"` for browser-based widgets (your public site or authenticated web app) and `"mobile"` for your native iOS and Android apps. Fini uses this to distinguish where a conversation originated, so you can segment analytics and tailor agent behavior by surface. Optional, omit it if you don't need to differentiate surfaces.
</ResponseField>

<ResponseField name="user_attributes" type="object">
  An arbitrary object of custom fields. Whatever you put here becomes available to the agent, plan tier, account ID, segment flags, anything that helps the bot personalize answers. The agent references these via [User Attributes](/en/api-reference/attributes) configured in your workspace.
</ResponseField>

### Signing the token

Sign with the **HS256** algorithm using your widget's **Signing Key**, find it in the Settings tab under the Signing Key section.

<Warning>
  **Sign JWTs server-side only.** The signing key is a secret. Never ship it in browser code, never commit it to source control, never paste it in screenshots. If it leaks, regenerate (contact your Fini contact) and rotate.
</Warning>

Node.js example:

```javascript theme={null}
const jwt = require("jsonwebtoken");

const customerToken = jwt.sign(
  {
    email: user.email,
    name: user.name,
    collectEmail: false,
    platform: "mobile",
    user_attributes: {
      userId: user.id,
      plan: user.plan,
      accountType: user.accountType,
    },
  },
  process.env.FINI_SIGNING_KEY,
  { algorithm: "HS256" }
);

// Then render the embed snippet with this token:
//   customerToken: "<your signed JWT>"
```

Pass the signed token to the widget by setting `customerToken` in `finiWidgetOptions`, the same place where `widgetId` and `mode` live.

## Configure your widget

All configuration lives on the **Settings** tab.

<Frame>
  <img src="https://mintcdn.com/fini/zctNPVP1t-q6dPqV/images/en/deploy/widget/settings-top.png?fit=max&auto=format&n=zctNPVP1t-q6dPqV&q=85&s=7ba77c7e12a760458aeb8579e2e392e3" alt="Widget Settings page in the Fini Demo workspace showing the Settings tab, Preview menu, Venmo Support widget selector, Connection Details, General setup, Branding, Advanced, Signing Key, Connected Integration, Track current page URL, Collect visitor email, and Save button" width="1680" height="1050" data-path="images/en/deploy/widget/settings-top.png" />
</Frame>

### Connection details

Read-only metadata about the widget, set at creation time:

<ResponseField name="Connected At" type="datetime">
  When the widget was created.
</ResponseField>

<ResponseField name="Connected By" type="string">
  The teammate who deployed the widget.
</ResponseField>

<ResponseField name="Select bot" type="string">
  The bot bound to this widget. **Locked after creation**, to use a different bot, create a new widget.
</ResponseField>

### General setup

<ResponseField name="Domain" type="string">
  The URL(s) where the widget is embedded. Fini uses these as the allowed origins for the widget script. Enter multiple domains on separate lines; wildcards like `*.yourcompany.com` are supported.
</ResponseField>

<ResponseField name="Widget title" type="string">
  Header label shown in the widget chrome (e.g., "Acme AI", "Support").
</ResponseField>

<ResponseField name="Description" type="string">
  Short text shown near the top of the floating widget. Use it to set expectations for what the agent can help with.
</ResponseField>

### Branding

<Frame>
  <img src="https://mintcdn.com/fini/zctNPVP1t-q6dPqV/images/en/deploy/widget/settings-branding.png?fit=max&auto=format&n=zctNPVP1t-q6dPqV&q=85&s=a503200d77587077ce55a87dbf29cd78" alt="The Branding section of widget settings with controls for the widget's brand color, brand logo, pre-defined questions, and thinking messages." width="1682" height="768" data-path="images/en/deploy/widget/settings-branding.png" />
</Frame>

Visual customization for the widget's chat experience:

<ResponseField name="Select a color" type="string">
  The brand color used for the widget's send button, user message bubbles, and accent elements. Hex format (e.g., `#1D84FF`).
</ResponseField>

<ResponseField name="Brand Logo" type="file">
  The icon shown in the widget header next to the bot name. Image upload (PNG recommended); max 2 MB. Use a square, high-contrast logo so it reads at small sizes.
</ResponseField>

### Thinking messages

Thinking messages are the short phrases shown while the bot is preparing a reply. Configure them from **Widget Settings → Branding → Thinking messages**.

<ResponseField name="Thinking messages" type="array">
  Three short phrases that rotate in the widget while an answer is being generated. The messages cycle every 4 seconds.
</ResponseField>

Use short, reassuring copy. For example:

* `Pulling up the information...`
* `Double checking the details...`
* `Putting it all together...`

Customers do not need to implement this state in their own code. After the widget is embedded, Fini displays the configured thinking messages automatically during the loading state.

### Welcome text

The welcome text appears before the customer starts a conversation. In the floating widget, it appears under the header and brand logo. In standalone mode, it appears at the top of the empty chat panel.

Use one short sentence that tells customers what to ask. For example: `Ask us about orders, returns, account settings, or billing.`

### Predefined questions

Surface suggested prompts on the widget's greeting screen so visitors know what they can ask. Predefined questions appear as tappable chips before the conversation starts. When a customer clicks one, the widget submits that question immediately.

Choose 3-5 high-leverage questions that cover your top tickets, for example:

* `How do I reset my password?`
* `Where is my order?`
* `Cancel my subscription`

Predefined questions disappear after the conversation starts.

### Reference links

When reference links are enabled, the widget can show a collapsible **Learn more via...** section under an assistant answer.

The widget deduplicates links before showing them:

* Public source links can appear as clickable reference chips.
* Private Google Cloud Storage references are counted as private links but are not exposed as clickable customer links.
* If no public links are available, the widget can still tell the customer that private references were used.

Turn reference links off if you do not want customers to see source links below answers.

### Notifications

Notification settings are controlled from the customer-side `notifications` object in `finiWidgetOptions`.

<ResponseField name="notifications.sound" type="boolean">
  Set to `true` to play a sound when there is new widget activity. Set to `false` to keep the widget silent.
</ResponseField>

<ResponseField name="notifications.browser" type="&#x22;never&#x22; | &#x22;ask&#x22; | &#x22;always&#x22;">
  Controls browser notifications. Use `"never"` to disable browser notifications, `"ask"` to request permission when needed, or `"always"` to show notifications whenever browser permission is already available.
</ResponseField>

<ResponseField name="notifications.pulse" type="boolean">
  Set to `true` to pulse the floating widget launcher when the widget is closed and there is new activity. This is most useful with `mode: "widget"`.
</ResponseField>

### Advanced

Advanced settings control conversation metadata and visitor identity behavior.

### Signing Key

The secret used to sign JWTs for authenticated widget conversations. See [Identify logged-in users](#identify-logged-in-users) for the JWT flow. The key is read-only in the UI, you can copy it but not regenerate or edit it from this page. Contact your Fini contact if you need a rotation.

### Track current page URL

Off by default. When enabled, Fini records the URL of the page each message is sent from, useful for analytics and bot context when reviewing conversations. Turn it on when the widget appears across multiple pages and you want each message to carry its source page URL automatically.

### Collect visitor email

Off by default. When enabled, the widget asks visitors for their email before starting a chat. Leave it off when your authenticated app already passes a verified email through the widget token.

## Escalate to your helpdesk

When the agent in the widget can't resolve a conversation, the conversation can hand off to a human agent as a real ticket in your existing helpdesk. Widget escalation is configured through [Business Rules](/en/automations/business-rules), not from the widget settings panel.

Today, five integrations work as widget escalation destinations:

<CardGroup cols={2}>
  <Card title="Zendesk" icon="headset" href="/en/automations/business-rules">Use a Business Rule template or custom rule.</Card>
  <Card title="Front" icon="inbox" href="/en/automations/business-rules">Use a Business Rule template or custom rule.</Card>
  <Card title="Gorgias" icon="cart-shopping" href="/en/automations/business-rules">Use a Business Rule template or custom rule.</Card>
  <Card title="Salesforce" icon="cloud" href="/en/automations/business-rules">Use a Business Rule template or custom rule.</Card>
  <Card title="HubSpot" icon="building" href="/en/automations/business-rules">Use a Business Rule template or custom rule.</Card>
</CardGroup>

General flow regardless of destination:

<Steps>
  <Step title="Connect the destination helpdesk first">
    Authorize the integration on its Deploy page. You don't need to configure the helpdesk's own Agent Routing or Reply Settings if you're using it only as a widget escalation destination, just authorize.
  </Step>

  <Step title="Open Rulebook → Business Rules">
    Business Rules run when a widget conversation escalates. They own ticket creation, handoff metadata, and any final customer-facing message.
  </Step>

  <Step title="Create a default or custom Business Rule">
    Start from a default escalation template when it matches your helpdesk workflow, or create a custom rule when routing depends on attributes, fields, or provider-specific behavior.
  </Step>

  <Step title="Map the integration fields">
    Map the template fields or Tool inputs the rule needs, such as the destination channel, queue, case fields, customer email, transcript, or interaction ID.
  </Step>

  <Step title="Test and save the Business Rule">
    Use **Test Rule** before relying on the handoff in production. The widget will use the published Business Rule when the conversation escalates.
  </Step>
</Steps>

### Destination-specific notes

Zendesk, Front, Gorgias, Salesforce, and HubSpot each need a connected integration before Business Rules can hand off to them.

* **Zendesk**: connect Zendesk first on the [Zendesk deploy page](/en/deploy/zendesk). For Chat escalations, customer-uploaded files from the widget are forwarded into the Zendesk conversation as native attachments when Zendesk accepts the file. The transcript still includes download links as a fallback.
* **Front**: connect Front first on the [Front deploy page](/en/deploy/front). Front escalations use email channels.
* **Gorgias**: connect Gorgias first on the [Gorgias deploy page](/en/deploy/gorgias). Fini creates a Gorgias ticket from the widget escalation and suppresses the integration webhook for that ticket, so Fini does not treat its own escalation as a new Gorgias conversation to answer.
* **Salesforce**: connect Salesforce first on the [Salesforce deploy page](/en/deploy/salesforce). Fini creates a Salesforce Case with the connected integration credentials; case ownership and queueing follow your Salesforce assignment rules.
* **HubSpot**: connect HubSpot first on the [HubSpot deploy page](/en/deploy/hubspot). Fini can create a HubSpot ticket directly or submit a published HubSpot support form, depending on the Business Rule template. Direct ticket creation uses the first active open ticket stage unless your rule maps a specific pipeline stage.

For the full configuration flow, see [Business Rules](/en/automations/business-rules).

## Verify it's working

<Steps>
  <Step title="Preview the widget">
    Open the **Preview** dropdown on the Embed Script tab and pick a preview mode. A new browser window opens with the widget rendered against your live bot.
  </Step>

  <Step title="Ask a question the bot should answer">
    Test the happy path. The bot should respond from your knowledge base with the styling you configured (color, logo).
  </Step>

  <Step title="(If escalation is configured) Test the escalation path">
    Ask a question the agent can't help with. Then check the destination helpdesk, Zendesk, Front, Gorgias, Salesforce, or HubSpot, to confirm a ticket or case was created with the conversation history attached. If you're testing Zendesk Chat and the widget conversation included a file, confirm the file appears in the Zendesk conversation too.
  </Step>
</Steps>

## Common questions

<AccordionGroup>
  <Accordion title="How does the widget know who a logged-in user is?" icon="id-badge">
    Sign a JWT on your server with the widget's **Signing Key** (HS256) and pass it as `customerToken` in `finiWidgetOptions`. The payload carries `email`, `name`, `collectEmail`, `platform`, and any `user_attributes` you want the agent to use. Never sign tokens in browser code. See [Identify logged-in users](#identify-logged-in-users).
  </Accordion>

  <Accordion title="Where can widget conversations escalate?" icon="arrow-up-right-from-square">
    To a ticket in **Zendesk, Front, Gorgias, Salesforce, or HubSpot**, through a [Business Rule](/en/automations/business-rules) with source **Widget** and trigger **On Escalation**. Intercom, LiveChat, and Slack work as direct integrations only and aren't widget escalation destinations. In workspaces with native ticketing, escalated widget conversations can also be handled as native tickets in [Inbox](/en/testing/inbox#native-ticketing), routed by [Agent groups](/en/configuration/agent-groups). See [Fini on top of your helpdesk](/en/deploy/on-top-of-your-helpdesk) for how each destination behaves.
  </Accordion>

  <Accordion title="Can I match the widget to my brand?" icon="palette">
    Yes. On the **Settings** tab you set the **Widget title**, **Description**, brand color (**Select a color**), **Brand Logo** (PNG recommended, max 2 MB), welcome text, three rotating **Thinking messages**, and **Predefined questions**. Use the **Preview** dropdown to check the result before going live.
  </Accordion>

  <Accordion title="Does the widget work in mobile apps?" icon="mobile-screen">
    Yes. The same widget and configuration run in iOS and Android apps; talk to your Fini contact for the current mobile embedding setup. Pass `platform: "mobile"` in the JWT so analytics and agent behavior can distinguish mobile conversations from web.
  </Accordion>

  <Accordion title="Can one widget run on several domains?" icon="globe">
    Yes. Enter one domain per line in the **Domain** field; wildcards such as `*.yourcompany.com` cover every subdomain. `localhost` works for testing without a domain match.
  </Accordion>

  <Accordion title="What languages does the widget answer in?" icon="language">
    Fini supports 130+ languages. The language the agent answers in is part of the agent's configuration, set in [Prompts](/en/configuration/prompts) (language rules live in Role & Context), so the widget follows the same language behavior as the agent's other surfaces.
  </Accordion>

  <Accordion title="Can my product open the widget or start a conversation?" icon="code">
    Yes. Use the SDK through `window.fini`: `fini("open")`, `fini("close")`, and `fini("sendMessage", message)`, and subscribe to `open`, `close`, and `sendMessage` events for analytics. See [SDK controls](#sdk-controls).
  </Accordion>

  <Accordion title="Do customers see the sources behind an answer?" icon="link">
    Only if reference links are enabled. Public source links appear under **Learn more via...**; private Google Cloud Storage references are counted but never exposed as clickable links. Turn reference links off to hide sources entirely.
  </Accordion>
</AccordionGroup>

## Troubleshooting

<AccordionGroup>
  <Accordion title="The widget doesn't appear on my site" icon="circle-question">
    Check in order:

    1. The script snippet is pasted inside or after the closing `</body>` tag.
    2. Your live domain matches one of the entries in the widget's **Domain** field (including any wildcards). Trailing slashes and protocols matter, `https://app.acme.com` and `app.acme.com` are different entries.
    3. There's no Content Security Policy on your site blocking external scripts. The widget script is served from `storage.googleapis.com/fini-widget/assets/fini-widget-prod.min.js`.
    4. Open the browser console: any errors mentioning "widget", "fini", or CORS usually point at the cause.
  </Accordion>

  <Accordion title="The widget shows but the bot doesn't know who the user is" icon="user-slash">
    The `customerToken` is either missing, malformed, or signed with the wrong key. Confirm:

    1. The token is being signed **server-side** with the correct **Signing Key** from this widget's settings.
    2. The algorithm is **HS256**.
    3. The token is being passed to `finiWidgetOptions.customerToken` as a string (not the parsed JSON payload).
    4. Inspect the token at `jwt.io` (against the signing key) to confirm the payload shape matches what's documented above.
  </Accordion>

  <Accordion title="Customers see Domain not authorized" icon="ban">
    The domain saved on the widget doesn't match where the script is loaded from. Update the **Domain** field under General setup on the Settings tab. Wildcards like `*.acme.com` cover all subdomains; bare domains don't.
  </Accordion>

  <Accordion title="The widget shows but escalation doesn't work" icon="triangle-exclamation">
    Confirm:

    1. The destination integration is connected and authorized on its own deploy page.
    2. A published Business Rule is assigned to this bot with source **Widget** and trigger **On Escalation**.
    3. The Business Rule template fields or Tool inputs are mapped to the right destination fields.
    4. The rule passes **Test Rule** with representative widget escalation context.
    5. For Salesforce: widget escalation does not require the manual Salesforce setup. If escalation is failing, verify the Salesforce credentials on the Salesforce deploy page are still valid (tokens expire and may need to be refreshed).
  </Accordion>
</AccordionGroup>


## Related topics

- [Help Center](/en/deploy/helpcenter.md)
- [Channel overview](/en/deploy/overview.md)
- [Fini on top of your helpdesk](/en/deploy/on-top-of-your-helpdesk.md)


This documentation is built and hosted on [Mintlify](https://mintlify.com), a developer documentation platform.