> ## Documentation Index
> Fetch the complete documentation index at: https://docs.usefini.com/llms.txt
> Use this file to discover all available pages before exploring further.
# Quickstart
> Get your first Fini AI support agent live in one sitting. Five steps from a fresh workspace to a working deployment on your channel of choice.
This guide takes you from a brand-new account to a deployed AI agent that's actually answering customer questions. By the end you'll have an agent answering from real knowledge, deployed safely to a real channel, and a feedback loop you can run every day to keep it sharp.
You'll do five things, in this order:
1. **Create** an agent.
2. **Give it knowledge** to answer from.
3. **Deploy** it to a channel, safely, in shadow mode.
4. **Iterate** in the Inbox by reading real conversations and the AI Steps trace.
5. **Harden** the agent with Test Suite once you have a handful of real conversations to draw from.
Steps 1–3 take about 20 to 30 minutes if you have your help-center content and a target channel ready. Steps 4 and 5 are continuous, they're how you make the agent better week over week. Everything else, custom prompts, multi-step workflows, integrations with your APIs, layers in later without disrupting what you build here.
```mermaid theme={null}
graph LR
A[Step 1
Create
agent] --> B[Step 2
Add
Knowledge]
B --> C[Step 3
Deploy
shadow mode]
C --> D[Step 4
Iterate
in Inbox]
D <--> E[Step 5
Harden with
Test Suite]
```
You'll need a Fini account at [app.usefini.com](https://app.usefini.com) before starting. If you don't have one, ask your team admin to invite you.
## How Fini fits together
Every agent in Fini has four aspects, and the five steps below configure them in order:
| Aspect | What it is | Where in this guide |
| - | - | - |
| **Knowledge** | What the agent knows. | Step 2 |
| **Behavior** | How the agent acts, its tone, the workflows it runs, when it responds. | Step 3 sets shadow mode (your first Behavior setting); Prompts, Rulebook, Tags, and Reply Rules deepen after the Quickstart. |
| **Deployment** | Where the agent shows up, widget, helpdesk, help center. | Step 3 |
| **Observability** | How you watch and improve it. | Steps 4 and 5 |
You configure each aspect independently and they compose into one running agent. One workspace can run many agents, one for billing, one for onboarding, one for internal IT, each with their own knowledge, behavior, and deployments.
For the full mental model and what makes Fini different from other AI support tools, see the [Introduction](/en/introduction).
## Step 1: Create your agent
An **agent** in Fini is the unit you deploy. It's a named container that combines knowledge, behavior, and one or more deployments. Some teams run a single agent across everything; others split by function (Support-AI, Billing-Agent, Internal-IT-Bot). You can always add more later.
Open the dashboard at [app.usefini.com](https://app.usefini.com). The first page you'll see is **Home**.
The **agent picker** appears in the product shell. Per-agent things, Rulebook rules, Reply Rules, Tags, Behavior settings, the Inbox view, flow through this picker. (Sources are an exception; they're workspace-level and serve every agent in the workspace.)
Select the agent you want to configure from **Your bots** on Home. If your workspace needs a new agent, click **+ Create bot**. The dashboard may still use *bot* in some labels; bot and agent refer to the same thing.
Pick a name that reflects its role: `Support-AI`, `Billing-Agent`, `Help-Desk-Bot`. You can rename it later, but the name shows up in every agent picker across the dashboard, so descriptive beats generic.
The agent appears in your grid right away. You're ready to configure it.
If you'll run multiple agents (one for billing, one for onboarding, one for internal IT), name them by function from day one. `Support-Billing` scales better than `Bot-1`.
For more on the home page and agent management, see [Home](/en/configuration/agent-home).
## Step 2: Give your agent knowledge
Your agent answers from the **Knowledge** section. Knowledge is workspace-level, every agent in your workspace draws from the same Knowledge graph, so you only configure this once. The sidebar splits it into four subsections:
* **Sources** are raw inputs, URLs, files, integrations with Notion or Google Drive. Fastest to set up.
* **Generate** uses an LLM to turn raw Sources into structured article drafts. Good for the top fifty questions you want exact answers to.
* **Reviews** is the queue where new content from any path gets approved before it lands in Articles.
* **Articles** is the curated knowledge graph, the source of truth the agent retrieves from.
For the Quickstart, start with Sources. It's the lowest-friction way to give your workspace something useful to answer from. You can promote selected Sources content into curated Articles later via Generate, going through Reviews for an explicit approval step.
From the sidebar, go to [Knowledge → Sources](/en/knowledge/sources).
Pick the option that matches the content you already have:
* **Help center sitemap**: paste your sitemap URL. Recommended if you have a public help center; it gives the agent broad coverage in one shot.
* **Individual URLs**: drop in one or more public help articles. Use this when you only want to pilot with a few pages.
* **File upload**: PDFs, Word docs, or markdown files. Use this for internal documentation that isn't on a public site.
* **Third-party stores**: Notion, Google Drive, Confluence, or Zendesk Help Center. Use these if your content lives in a tool the team already maintains.
Fini parses and indexes the content. For a typical help center this takes a few minutes; large knowledge bases can take longer. You'll see status indicators on each source as it processes. Once indexed, every agent in the workspace can retrieve from it.
That's enough to get started. Sources alone will let your agents answer common questions covered by your help content.
For the top fifty questions you want *exact* answers to, run [Knowledge → Generate](/en/knowledge/magic-articles) after the Quickstart. Sources covers the long tail with raw indexed content; Generate produces curated article drafts you review and approve. Use both, Sources for breadth, Generate-backed Articles for fidelity on your most-asked questions.
For a fuller view of how Knowledge is organized, including how Sources feeds into Reviews and lands in Articles as the source of truth, see the [Knowledge overview](/en/knowledge/overview).
## Step 3: Deploy your agent
Now connect the agent to a channel customers actually use. Two decisions before you pick.
**Which channel?** Match where your customers already reach you today.
A chat bubble on every page. Fastest to set up: drop a script tag and you're live.
Zendesk, Intercom, HubSpot, Salesforce, Front, Gorgias, LiveChat, or Slack. The agent replies on incoming tickets inside the tool you already use.
A hosted, AI-powered knowledge base your customers search.
If you're not sure:
| If your support today is mostly… | Start with |
| - | - |
| Customers messaging through your website | [Widget](/en/deploy/widget) |
| Tickets in a helpdesk (Zendesk, Intercom, etc.) | The matching [helpdesk integration](/en/deploy/overview#inside-your-helpdesk) |
| Both website and helpdesk | [Widget with helpdesk escalation](/en/deploy/overview#combining-the-widget-with-a-helpdesk) |
**Customer-facing or shadow mode?** This is the bigger first-time decision, and we recommend starting in shadow mode.
**Shadow mode lets you ship with confidence.** The agent posts internal notes only, your team sees what it *would* have said, but the customer doesn't. You build trust over a few days, see what kinds of replies it generates, catch issues before they're customer-visible, then flip to direct reply once you're ready.
For regulated industries (fintech, healthcare, banking) where wrong answers are expensive, shadow mode is the default. For lower-stakes contexts where you want faster feedback, direct reply is fine from day one. You can switch at any time under [Reply Rules](/en/automations/reply-behavior).
Follow the deployment page for your channel. Each one walks through the connect flow, picking which agent answers, and choosing direct-reply versus shadow mode.
Once deployed, send a few test messages through the channel yourself, the same way a customer would. These will show up in the Inbox in Step 4, with the full reasoning trace, so you can verify the agent is behaving as expected before you open the floodgates.
## Step 4: Iterate in the Inbox
The **Inbox** is where you actually develop your agent in Fini. Every test message you send and every real conversation that comes in lands in the Inbox with its full reasoning trace. That's your feedback loop.
Click [Inbox](/en/testing/inbox) in the sidebar. You'll see conversations for the selected agent, with filter pills across the top such as Knowledge, Ticket Id, Conversation status, Fini Touched, Feedback, and Feedback Notes. Native-ticketing workspaces show the ticket queue here, with assignee, priority, status, and saved-view controls.
The **Fini Touched** filter is the most useful one to start with, set it to *Yes* and you'll see only conversations the agent actually engaged with, hiding ones where it stayed silent.
The right pane shows the message thread. Two affordances on this view are worth knowing about up front:
* **Metadata** in the top-right opens conversation-level context, the user attributes that were passed in, links to any external ticketing system, channel details, and so on. Use this when you want to know *who* the conversation is with.
* **The light bulb icon on each agent message** opens the **AI Steps trace** for that specific reply, every retrieval, every classification, every reasoning step the agent took to produce that one message. Use this when you want to know *why* the agent said what it said.
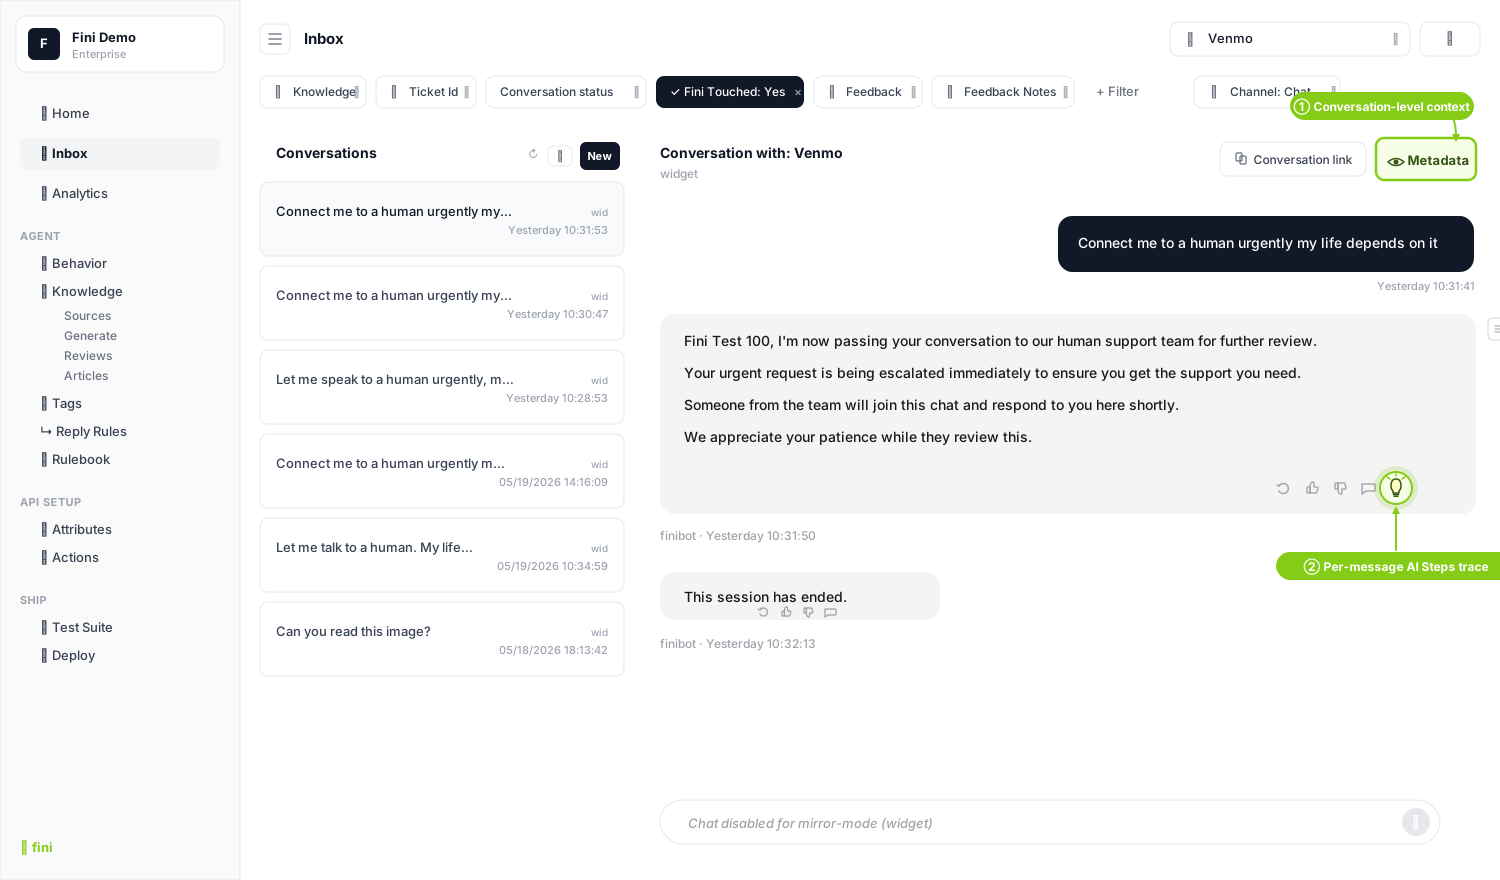 The trace is per-message because the agent's reasoning is per-message, Fini re-evaluates from the root on each customer turn. Click the light bulb on the reply you want to inspect.
Open your widget / helpdesk / channel as a customer would, and send three kinds of message. Each one will show up in the Inbox within seconds.
1. **A direct question** that maps clearly to one of your articles. *"How do I reset my password?"*, verifies basic retrieval works.
2. **A paraphrased or adjacent question** that uses different words for the same intent. *"I forgot my login, can you help?"*, verifies the agent retrieves on intent, not keyword.
3. **An out-of-scope question** the agent shouldn't try to answer. *"What's the weather today?"*, verifies the agent declines gracefully instead of hallucinating.
For each reply that's wrong, off-tone, or too generic, work the loop:
1. **Open the AI Steps trace** by clicking the light bulb icon on the agent's reply.
2. **Find where the answer diverged**: which sources were retrieved, what got matched, where the agent landed.
3. **Identify the cause**: usually one of:
* Missing knowledge: add the article to [Sources](/en/knowledge/sources) or write it directly in [Articles](/en/knowledge/articles).
* Wrong tone or format: adjust the [Main Guidelines](/en/configuration/prompts) under your agent's Behavior settings.
* Generic answer when it should be personal: connect [Attributes](/en/api-reference/attributes) under API Setup to pull in the customer's plan, account state, or other context.
4. **Fix it where it lives**: then **send the question again** from the deployed channel and verify the new trace looks right.
The loop tightens fast. After your first hour you'll spot most issues in seconds and fix them in minutes.
Fini watches conversations the agent handles and surfaces improvements automatically in [Review](/en/knowledge/review): gaps in your knowledge base (questions the agent couldn't answer), conflicts between sources, and intents where conversations consistently end in negative sentiment. Proposed updates queue for your review; nothing ships without you.
For more on Inbox filters, the AI Steps trace, and the feedback workflow, see [Inbox](/en/testing/inbox).
## Step 5: Harden the agent with Test Suite
Once you have a handful of conversations the agent handled well, lock in that quality with **Test Suite**. It's the regression-testing layer that catches when a future change (a new prompt, a knowledge update, a Rulebook tweak) quietly breaks something that used to work. The earlier you start saving Test Sets, the faster the feedback loop tightens.
Under the **Ship** section in the sidebar, go to [Test Suite](/en/testing/test-suite).
Click **New test set**. Give it a name like `Golden conversations, week 1`. A test set is a collection of conversations you've judged as correct, these become the bar future runs are compared against.
Click **Add from inbox** and pick 10 to 40 real conversations where the agent handled things well. Hand-picked is better than randomly sampled, you want conversations that capture the behaviors you actually care about.
For each conversation, set a **goal** the run should resolve, most commonly *goal resolution*: did the agent resolve the user's intent without leaving them confused or escalating unnecessarily? The judge evaluates each run against this goal and returns Pass or No Pass.
Click **Run** to execute the test set. The conversations replay against your current agent configuration, and each one is judged against its goal. You'll see a pass percentage (e.g., *85% pass, 34 passing, 6 failing*), with a per-conversation breakdown showing exactly which cases failed and why.
Each completed run is preserved, Run history tracks the pass rate over time, so you can see whether changes are moving you forward or backward.
Re-run the test set whenever you change something significant, a new prompt, an updated Knowledge source, a Rulebook revision. If the pass rate drops, you know which conversations regressed before customers do.
**Run vs Re-judge.** The **Run** action replays the conversations through your current agent and judges each result. The **Re-judge** action (top-right of an existing run) only re-evaluates that run's results against the current judge rubric, useful when you've updated what counts as a pass and want to score historical runs the new way without spending compute to replay them.
Build several test sets, each covering a different slice of behavior, *Refunds*, *Account access*, *Onboarding*, *Escalations*. You don't need full coverage from day one; start with 10 conversations covering the cases that matter most, and grow the suite as you discover new failure modes.
For more on Test Suite, judges, and run history, see [Test Suite](/en/testing/test-suite).
## What's next
You've got a working agent with a feedback loop and regression coverage. Where most teams go from here, in roughly the order they need it:
Customize **Prompts** under the Behavior section with your tone, formatting rules, and guardrails. The single biggest lever for reply quality after knowledge.
Use **Attributes** under API Setup to pull in the customer's plan, recent orders, or account state on every message.
Use **Rulebook** for multi-step flows like cancellations, refunds, or VIP escalation paths. Behavior trees with deterministic execution.
**Reply Rules** decide whether the agent replies directly, posts an internal note (shadow mode), or stays silent. Switch off shadow mode here when you're ready to go customer-facing.
Define **Actions** under API Setup, API calls the agent can invoke mid-conversation (cancel a subscription, look up an order, update an address).
Use **Tags** to auto-classify every conversation. Drives Rulebook logic and surfaces patterns in Analytics.
Open **Analytics** for resolution rate, deflection, CSAT, sentiment, and escalation breakdowns. The page you open when someone asks *"is the agent working?"*.
Deploy the same agent to multiple surfaces. One Knowledge graph, one set of rules, every customer touchpoint covered.
**Review** surfaces gaps, conflicts, and prompt-level issues for approval. Nothing ships without your approval.
For a worked example that ties Attributes, Actions, Rulebook, and Reply Rules together end to end, read the [cancellation flow walkthrough](/en/walkthroughs/cancellation-flow). It's the canonical example of how the four automation pieces fit together.
## Related topics
- [Introduction](/en/introduction.md)
- [End-to-end: order status and changes](/en/walkthroughs/order-status-and-changes.md)
- [End-to-end: cancellation flow](/en/walkthroughs/cancellation-flow.md)
This documentation is built and hosted on [Mintlify](https://mintlify.com), a developer documentation platform.
The trace is per-message because the agent's reasoning is per-message, Fini re-evaluates from the root on each customer turn. Click the light bulb on the reply you want to inspect.
Open your widget / helpdesk / channel as a customer would, and send three kinds of message. Each one will show up in the Inbox within seconds.
1. **A direct question** that maps clearly to one of your articles. *"How do I reset my password?"*, verifies basic retrieval works.
2. **A paraphrased or adjacent question** that uses different words for the same intent. *"I forgot my login, can you help?"*, verifies the agent retrieves on intent, not keyword.
3. **An out-of-scope question** the agent shouldn't try to answer. *"What's the weather today?"*, verifies the agent declines gracefully instead of hallucinating.
For each reply that's wrong, off-tone, or too generic, work the loop:
1. **Open the AI Steps trace** by clicking the light bulb icon on the agent's reply.
2. **Find where the answer diverged**: which sources were retrieved, what got matched, where the agent landed.
3. **Identify the cause**: usually one of:
* Missing knowledge: add the article to [Sources](/en/knowledge/sources) or write it directly in [Articles](/en/knowledge/articles).
* Wrong tone or format: adjust the [Main Guidelines](/en/configuration/prompts) under your agent's Behavior settings.
* Generic answer when it should be personal: connect [Attributes](/en/api-reference/attributes) under API Setup to pull in the customer's plan, account state, or other context.
4. **Fix it where it lives**: then **send the question again** from the deployed channel and verify the new trace looks right.
The loop tightens fast. After your first hour you'll spot most issues in seconds and fix them in minutes.
Fini watches conversations the agent handles and surfaces improvements automatically in [Review](/en/knowledge/review): gaps in your knowledge base (questions the agent couldn't answer), conflicts between sources, and intents where conversations consistently end in negative sentiment. Proposed updates queue for your review; nothing ships without you.
For more on Inbox filters, the AI Steps trace, and the feedback workflow, see [Inbox](/en/testing/inbox).
## Step 5: Harden the agent with Test Suite
Once you have a handful of conversations the agent handled well, lock in that quality with **Test Suite**. It's the regression-testing layer that catches when a future change (a new prompt, a knowledge update, a Rulebook tweak) quietly breaks something that used to work. The earlier you start saving Test Sets, the faster the feedback loop tightens.
Under the **Ship** section in the sidebar, go to [Test Suite](/en/testing/test-suite).
Click **New test set**. Give it a name like `Golden conversations, week 1`. A test set is a collection of conversations you've judged as correct, these become the bar future runs are compared against.
Click **Add from inbox** and pick 10 to 40 real conversations where the agent handled things well. Hand-picked is better than randomly sampled, you want conversations that capture the behaviors you actually care about.
For each conversation, set a **goal** the run should resolve, most commonly *goal resolution*: did the agent resolve the user's intent without leaving them confused or escalating unnecessarily? The judge evaluates each run against this goal and returns Pass or No Pass.
Click **Run** to execute the test set. The conversations replay against your current agent configuration, and each one is judged against its goal. You'll see a pass percentage (e.g., *85% pass, 34 passing, 6 failing*), with a per-conversation breakdown showing exactly which cases failed and why.
Each completed run is preserved, Run history tracks the pass rate over time, so you can see whether changes are moving you forward or backward.
Re-run the test set whenever you change something significant, a new prompt, an updated Knowledge source, a Rulebook revision. If the pass rate drops, you know which conversations regressed before customers do.
**Run vs Re-judge.** The **Run** action replays the conversations through your current agent and judges each result. The **Re-judge** action (top-right of an existing run) only re-evaluates that run's results against the current judge rubric, useful when you've updated what counts as a pass and want to score historical runs the new way without spending compute to replay them.
Build several test sets, each covering a different slice of behavior, *Refunds*, *Account access*, *Onboarding*, *Escalations*. You don't need full coverage from day one; start with 10 conversations covering the cases that matter most, and grow the suite as you discover new failure modes.
For more on Test Suite, judges, and run history, see [Test Suite](/en/testing/test-suite).
## What's next
You've got a working agent with a feedback loop and regression coverage. Where most teams go from here, in roughly the order they need it:
Customize **Prompts** under the Behavior section with your tone, formatting rules, and guardrails. The single biggest lever for reply quality after knowledge.
Use **Attributes** under API Setup to pull in the customer's plan, recent orders, or account state on every message.
Use **Rulebook** for multi-step flows like cancellations, refunds, or VIP escalation paths. Behavior trees with deterministic execution.
**Reply Rules** decide whether the agent replies directly, posts an internal note (shadow mode), or stays silent. Switch off shadow mode here when you're ready to go customer-facing.
Define **Actions** under API Setup, API calls the agent can invoke mid-conversation (cancel a subscription, look up an order, update an address).
Use **Tags** to auto-classify every conversation. Drives Rulebook logic and surfaces patterns in Analytics.
Open **Analytics** for resolution rate, deflection, CSAT, sentiment, and escalation breakdowns. The page you open when someone asks *"is the agent working?"*.
Deploy the same agent to multiple surfaces. One Knowledge graph, one set of rules, every customer touchpoint covered.
**Review** surfaces gaps, conflicts, and prompt-level issues for approval. Nothing ships without your approval.
For a worked example that ties Attributes, Actions, Rulebook, and Reply Rules together end to end, read the [cancellation flow walkthrough](/en/walkthroughs/cancellation-flow). It's the canonical example of how the four automation pieces fit together.
## Related topics
- [Introduction](/en/introduction.md)
- [End-to-end: order status and changes](/en/walkthroughs/order-status-and-changes.md)
- [End-to-end: cancellation flow](/en/walkthroughs/cancellation-flow.md)
This documentation is built and hosted on [Mintlify](https://mintlify.com), a developer documentation platform.