Documentation Index
Fetch the complete documentation index at: https://docs.usefini.com/llms.txt
Use this file to discover all available pages before exploring further.
Overview
Tags are labels that Fini applies to every conversation automatically, in real time. They’re organised into tag groups. Each group represents a single classification dimension, and Fini evaluates each conversation against your instructions to pick the right tag within that group. Tags serve two purposes:- Visibility: see patterns across your conversations: what topics customers ask about, why escalations happen, how your AI agent is performing
- Logic: use tag values as conditions in Rulebook rules, so your AI agent behaves differently depending on how a conversation is classified

How tags work
After each message exchange, Fini evaluates every active tag group against the conversation. For each group, Fini reads your AI Instructions (the decision rules you’ve written) and applies the most appropriate tag from that group. This happens automatically. You don’t trigger it and customers don’t see it. The tags accumulate on the conversation and are visible in Inbox. The quality of your AI Instructions directly determines the accuracy of your tags. A vague instruction produces inconsistent results. A specific instruction with clear decision rules, like “applyescalated if the AI agent used the phrase ‘let me connect you with our team’, apply resolved if no follow-up is pending”, produces reliable, actionable tags.
Types of tag groups
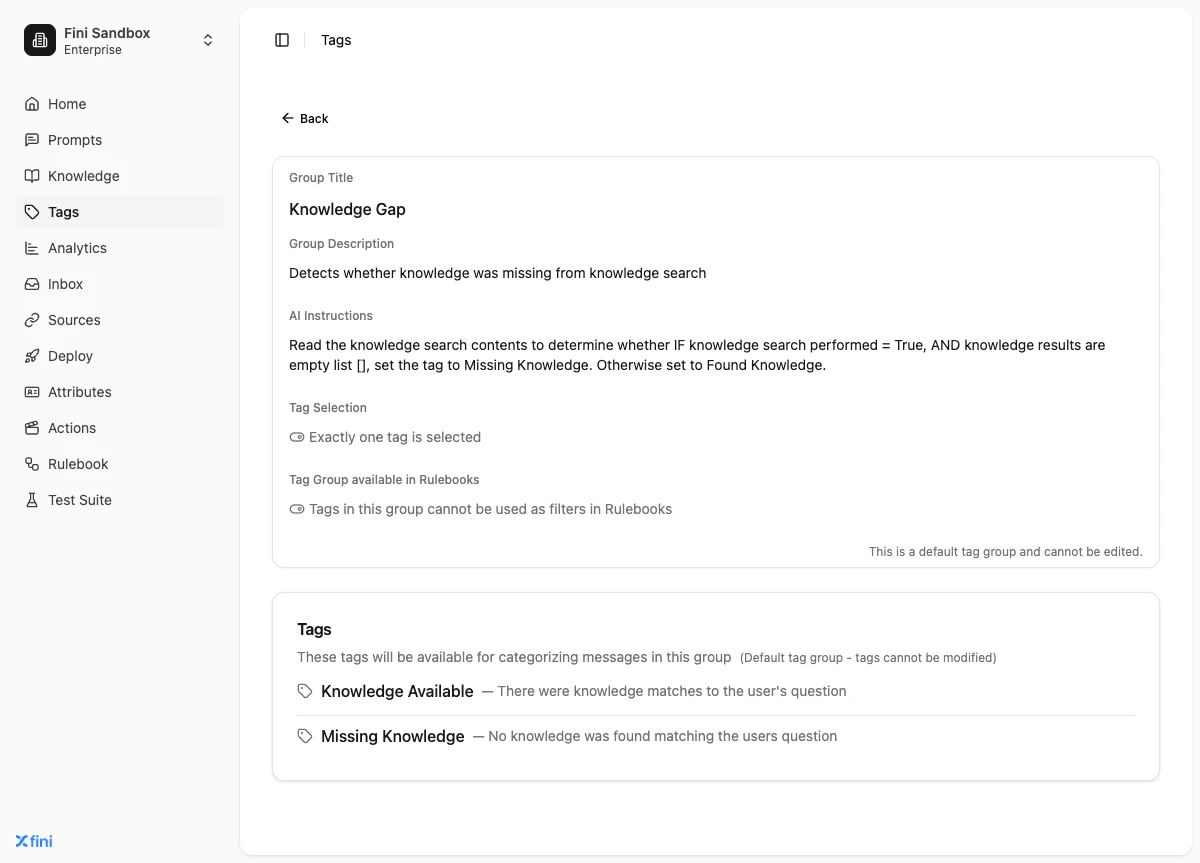
Mandatory
Mandatory tag groups are always active on every conversation across every AI agent. You cannot edit, delete, or disable them. The most important mandatory group is Conversation Status, which has three tags:| Tag | When it applies |
|---|---|
| Resolved | The AI agent gave a complete answer and no follow-up is pending |
| Escalated to Human Agent | The conversation was handed off to a human |
| Waiting for Customer | The AI agent asked for something and is waiting for the customer to respond |
Mandatory tag groups are system-managed. You cannot add, edit, or remove their tags.
Default
Default tag groups are pre-built by Fini and available to all accounts. Unlike Mandatory groups, you choose which AI agents they apply to. They are not automatically active on every AI agent. Default groups cover common classification needs out of the box. Assign them to an AI agent when you want that classification dimension tracked without building it from scratch.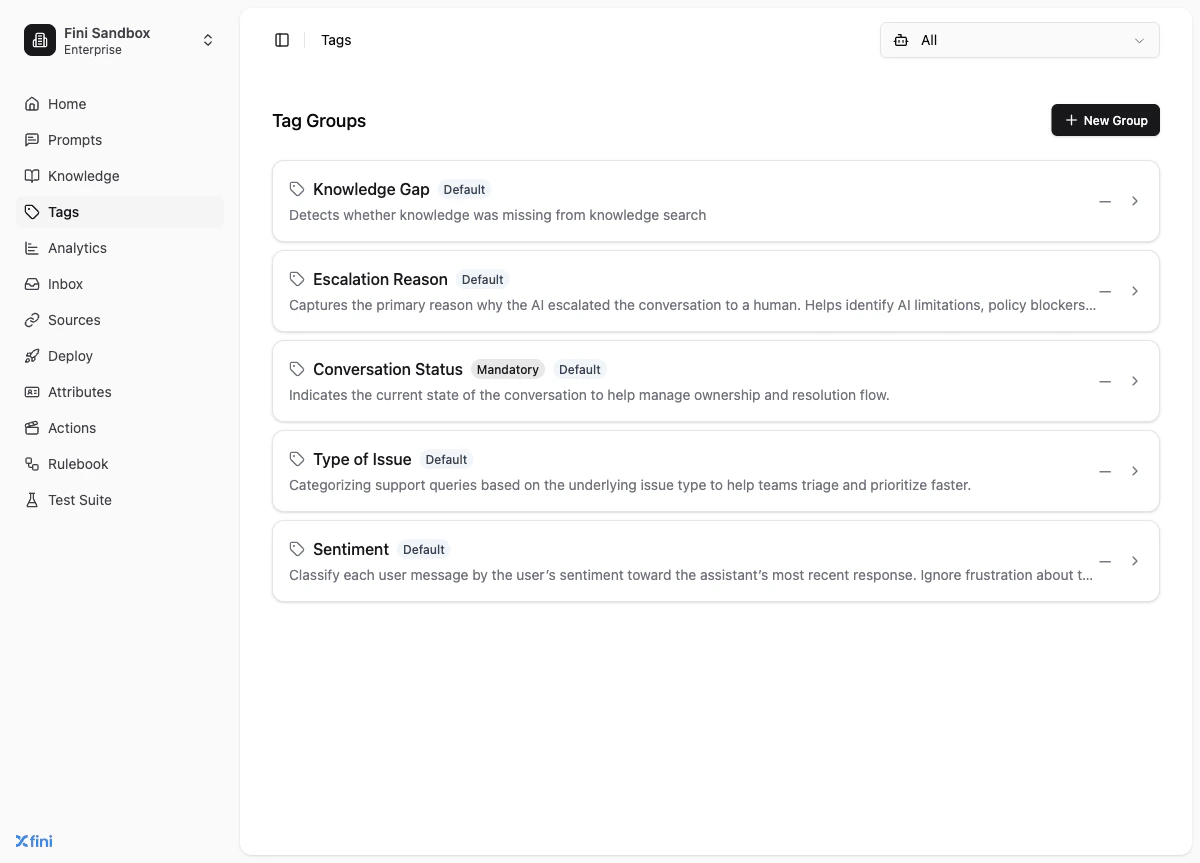
Custom
Custom tag groups are ones you create from scratch for your specific needs. They are fully editable: you define the title, description, instructions, which tags belong to the group, and whether the group is available as Rulebook conditions. Two patterns cover most use cases: Classification groups: categorise what conversations are about. Use these to understand your conversation mix and surface trends. Examples:- Product area (billing, onboarding, technical, account access)
- Type of query (refund request, status check, feature question)
- PII Redaction: did the AI agent reveal personal data it shouldn’t have?
- Tone & Compliance: did the AI agent use neutral, non-accusatory language?
- Claim Safety: did the AI agent make unsupported product claims?
Creating a tag group
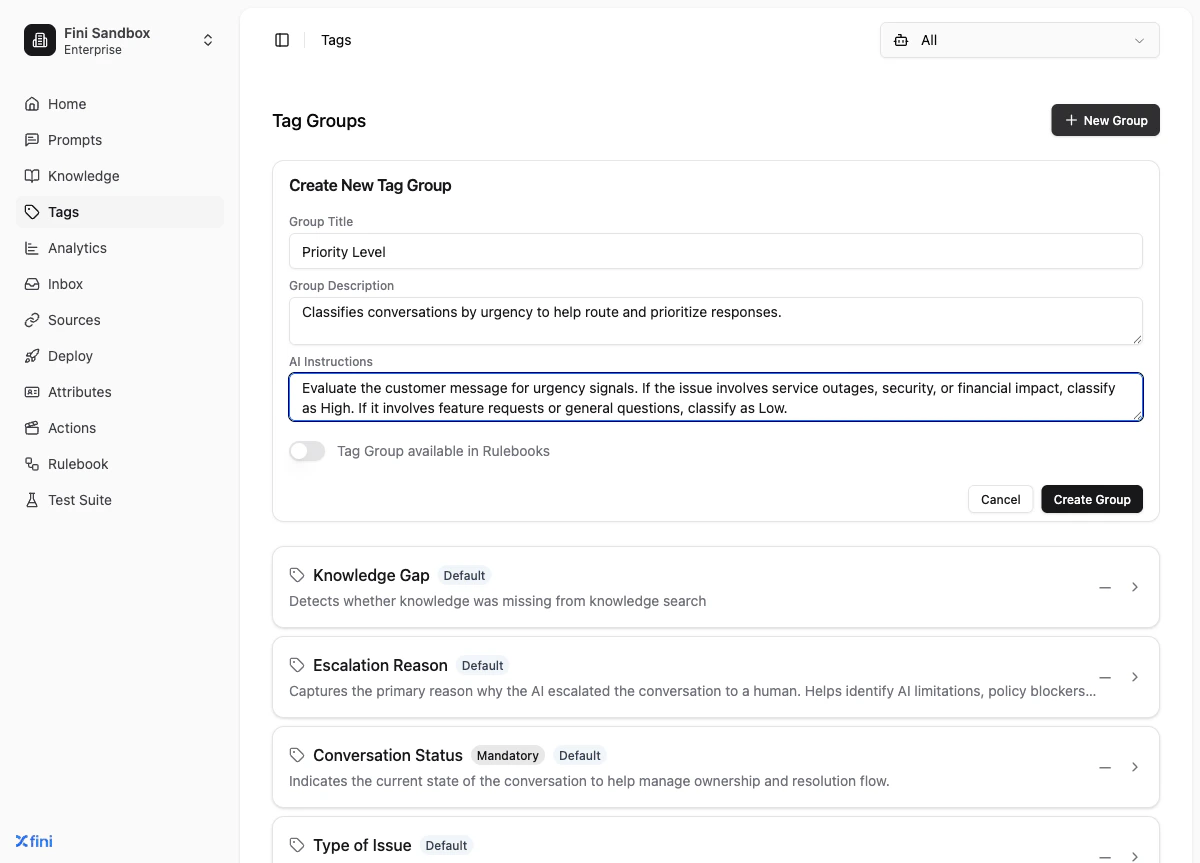
Fill in the group details
- Group Title: a short, descriptive name for the classification dimension (e.g. “Type of Issue”, “Guardrail | PII Redaction”)
- Group Description: human-readable context for your team about what this group classifies
- AI Instructions: the decision rules telling Fini how to evaluate the conversation and when to apply each tag. You can add this after creating the group, but it is critical for accuracy.
Enable Rulebook access if needed
Toggle Tag Group available in Rulebooks on if you want this group’s tags to be usable as conditions in Rulebook rules. You can change this later.
Adding tags to a group
Once inside a tag group, the Tags section at the bottom of the page is where you add the individual values the AI can apply.
- Enter the tag name: use short, machine-readable values (e.g.
resolved,user_denied,billing_dispute). These are what you reference in Rulebook conditions and see in Inbox filters. - Enter the description: this doubles as the decision rule for when to apply this specific tag. Be specific. Include example messages that should and shouldn’t trigger it.
- Click + Add.
Tag Selection
Each tag group has a Tag Selection setting that controls how many tags the AI can apply per conversation:- Exactly one tag is selected: Fini must pick exactly one tag from the group. Use this when options are mutually exclusive (e.g. Resolved vs. Escalated vs. Waiting for Customer).
- Multiple tags can be selected: Fini can apply more than one tag from the group to the same conversation. Use this when a conversation can belong to multiple categories at once (e.g. a conversation about both billing and account access).
Assigning tag groups to AI agents
Default and Custom tag groups must be explicitly assigned to each AI agent before they become active. Mandatory groups are always active and do not need assignment.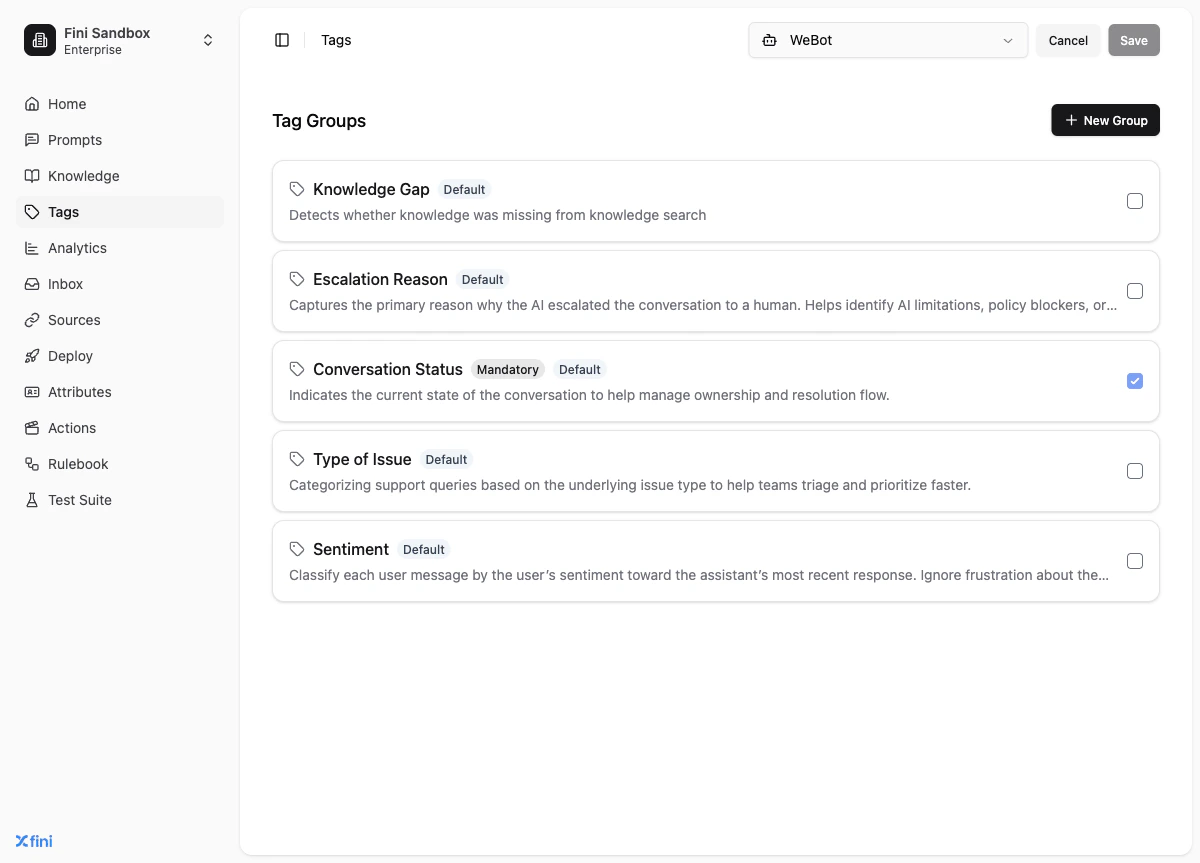
- Click the AI agent selector dropdown in the top right of the Tags page and choose an AI agent.
- Checkboxes appear on each tag group card.
- Check the groups you want active for that AI agent.
- Click Save.
Connection to Rulebook
Tags and Rulebook are designed to work together. The full loop:- Customer sends a message
- Your AI agent responds
- Fini evaluates every active tag group and applies the appropriate tags
- Rulebook reads those tag values and evaluates any rules that use them as conditions
- If a condition matches, the rule fires, routing the conversation, triggering a handoff, or changing reply behaviour
Example rules driven by tags
Escalation based on a guardrail group:
IF pii_detected → escalate to compliance team immediately
Routing based on topic:
IF Type of Issue = billing → route to billing specialist queue
Confirmation flow:
IF Action Confirmation =user_confirmed→ proceed with the action
IF Action Confirmation =user_denied→ send apology and offer alternatives
Mandatory tag groups (including Conversation Status) are not available as Rulebook conditions. Only Custom groups with the toggle enabled can be used.
Related
Rulebook
Use tag values as Check step conditions to route and branch conversations.
Attributes
User Attributes provide complementary context fetched automatically with every message in the conversation
Inbox
Filter and review conversations by tag value. Conversation Status drives the status badge on every conversation.
Analytics
View tag distribution across conversations over time.